


7
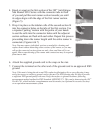
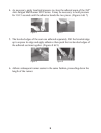
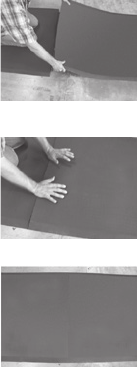
4. Kneel or squat on the first section of the 3M
™
Anti-Fatigue
Mat Runner 9910 Series with the connector tabs in front
of you and pull the next runner section towards you until
its edges aligns with the edge of the first runner section.
(Figure 5)
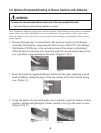
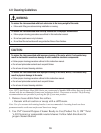
5. Drop it in place so the tubular cells of the second section fit
into the connector holes on the tabs of the first section. Use
a repeated ‘patting’ motion with the palms of your hands
to seat the cells into the connector holes until the adjacent
section surfaces are flush with each other. Repeat this process
proceeding down the runner length until the entire runner is
connected. (Figures 6 & 7)
Note: You may remove individual sections as needed for cleaning and
replace them without disturbing other sections of the runner, or you may
roll-up the connected sections from one end, clean, and then roll it out
again. Minor repositioning of the runner and connections may be required
from time to time.
6. Attach the supplied ground cord to the snap on the mat.
7. Connect the terminal on the other end of the ground cord to an approved ESD
ground.
Note: If the mat is being placed on an ESD conductive/dissipative tile or epoxy flooring it may
not be necessary to connect a ground cord to the mat. The ESD flooring may be able to provide
a sufficient ESD ground path for the mat. Verify the surface to ground resistance following
measurement method outlined in ESD Standard ANSI/ESD S7.1. This can be done using the 3M
™
Test Kit 701, which includes a megohmmeter and electrodes (see Optional Accessories section)
or an equivalent measurement system.
Figure 5
Figure 6
Figure 7