


7
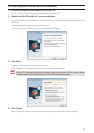
4. Check that “USB” is selected, then press the (ENTER) button on the remote control.
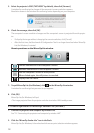
The projector’s wireless LAN standby screen is displayed on the screen.
• ThisscreenisonlydisplayedinEnglish.
• ThedefaultsettingforProjectorName(SSID)is“NECLEDPJ”.
• ServerIPisxedto“192.168.100.10”.
• Thedefaultsettingfor“Security”is“None”(notset).
TochangetheProjectorName(SSID),ChannelandSecuritysettings,see“2-3.Changingtheprojec-
tor’snetworksettings”onthispage.
• Pressthe(COMP.)buttonontheremotecontroltocancelthewirelessLANstandbyscreen.
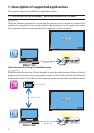
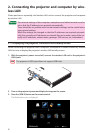
2-2. Connecting the projector and computer by wireless LAN
1. Display the projector’s wireless LAN standby screen.
See“2-1.Displayingtheprojector’swirelessLANstandbyscreen”.
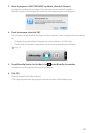
2. Display your computer’s wireless network settings screen.
Fordetailsonoperations,seeyourcomputer’soperatinginstructions.
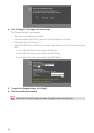
3. At the network selection item, select “NECLEDPJ” (when the projector’s default setting is
set).
ConnecttheprojectorandcomputerbywirelessLAN.
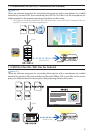
2-3. Changing the projector’s network settings
Use a web browser on the computer to change the projector’s network settings.
1. Display the projector’s wireless LAN standby screen.
See“2-1.Displayingtheprojector’swirelessLANstandbyscreen”.
2. Connect the projector and computer by wireless LAN.
See“2-2.ConnectingtheprojectorandcomputerbywirelessLAN”.
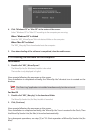
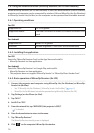
3. Launch a web browser on the computer, input “http://192.168.100.10/” in the URL input
eld, then press the (Enter) key.
The“WelcometotheNECProjectorServer”screenappears.
ThisscreenisonlydisplayedinEnglish.