


4
Turn power switch off before conducting any maintenance procedures.
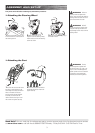
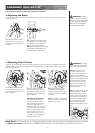
1 Using a 16mm open wrench,
loosen the chain jack-screw locknut
(B) and tighten or loosen the adjust-
ing bolt (A) to tighten or loosen the
chain as needed.
Note about chain adjustment:
The chain should not be under
tension nor floppy loose. There
should be about 3/8-inch (10mm)
of slack. BE CAREFUL NOT TO
ADJUST TOO TIGHT. The tensioning
system can easily impart too much
tension and snap the chain or bend
the motor output shaft. Turn the
adjusting bolt by hand 1/8 to 1/4
turn or less at a time and recheck
the adjustment each time.
2 Once the adjustment is good,
while holding the adjusting bolt,
retighten the locknut securely. Test
ride the Ground Force and readjust
as needed.
Note: If the locknut is not tightened
properly, the adjustment will vibrate
loose from normal use.
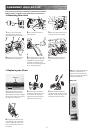
1 To adjust the brake, thread the
adjuster in or out 1/4 to 1/2 turns
until the desired brake adjustment
is attained.
The brake lever is fitted with a cable adjuster to compensate for cable stretch and/or to fine tune the lever movement
to brake engagement.
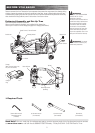
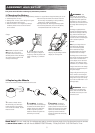
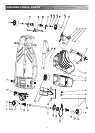
The chain drive system consists
of the drive-shaft sprocket (A), the
chain (B), the adjusting bolt (C), the
motor sprocket (D).
2 If the adjuster is threaded outward
and the brake still has too much slack,
use the auxiliary adjuster at the rear
brake for additional adjustments.
Note: When properly adjusted, the brake
lever will have approximately 3mm of
free play before the brake engages.
Need Help? Visit our web site for replacement parts, product support and a list of authorized service centers
at www.razor.com or call toll-free at 866-467-2967 Monday - Friday 8:00 AM - 5:00 PM Pacific Time.
ASSEMBLY AND SET-UP
q Adjusting Chain Tension
q Adjusting the Brake
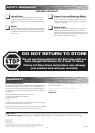
WARNING: To avoid a
pinch or injury, keep fingers away
from moving sprockets and chain.
Note: The motor cover does
not need to removed for this
adjustment procedure. The chain
adjustment can be checked by
tipping the Ground Force on it’s side
and reaching under the cover (with
power switched OFF). However,
for the first time you make this
adjustment we recommend you
remove the cover to see exactly
what is happening.
Note: Proper alignment of the chain
must be maintained. If the chain
is adjusted properly, but is noisy
or rough running, check alignment
of the sprockets. The drive-shaft
sprocket can be adjusted slightly
from side-to-side by loosening
the set screw. Note that a key
maintains the drive position to the
shaft.
WARNING: Practice in
an open area free from obstacles
until you are familiar with the brake
function. DO NOT RUN OVER ANY
OBJECT AS IT COULD DAMAGE
THE BRAKE OR DRIVETRAIN.
If the drive system makes loud noises, slips or makes grinding sounds while turned on, this indicates the drive chain is
probably making the noise. This can be caused by the chain being adjusted too tight during assembly or coming loose
from normal wear-and-tear.