


GTO 4000XLS Instruction Manual © 01.10.12 17
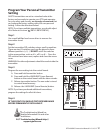
Program Your Personal Transmitter
Setting
All GTO transmitters are set to a standard code at the
factory and are ready to operate your GTO gate operator.
For your safety and security, we strongly recommend that
you replace the factory setting with your own personal
setting. Follow the directions below:
NOTE: If you have multiple transmitters, you should adjust
all of them at this time.
[RB741/RB742/RB743].
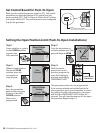
Step 1
Use a small phillips head screw driver to remove the
transmitter cover.
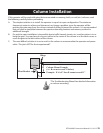
Step 2
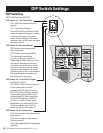
Set the transmitter DIP switches using a small screwdriver.
There are nine (9) switches; each can be placed in three
dierentpositions(+,0,–).DO NOT set all the switches
inthesameposition,suchasall+,all0,orall–.Oncethe
DIP switches have been reset, replace and close the access
cover.
WARNING: No other adjustments should be made inside the
transmitter.
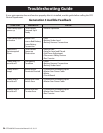
Step 3
Program the new setting into the control board:
A. Press and hold transmitter button.
B. Press and hold the LEARN RMT (Learn Remote)
button on the control board until the alarm sounds.
C. Release transmitter button. The new code is stored
in control board memory.
D. Release the LEARN RMT (Learn Remote) button.
NOTE: If you have purchased additional transmitters,
program the settings for all at this time.
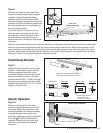
Step 4
AT THIS POINT YOU SHOULD TEST RECEIVER RANGE
BEFORE PERMANENTLY INSTALLING IT.
+
0
ECE
1 2 3 4 5 6 7 8 9
1 2 3 4 5 6 7 8 9
ECE
A23S 12V
ALKALINE BATTERY
+
0
–
LED
1 2 3 4
ON DIP
STATUS
LEARN RMT
LEARN
MAST LIMIT
LEARN
2ND LIMIT
S3
S4
S2
SOFT START OFF
WARNING OFF
OPEN PULL
SLV OPEN DLY.
MODE1 OFF
MODE2 OFF
ON
ON
PUSH
SIMULT.
ON
ON
120 MIN MAX
AUTO CLOSE TIME STALL FORCE
Learn Remote
Button
24/7 Troubleshooting Wizard: http://
support.gtoinc.com
The Troubleshooting Wizard has
detailed information this and other
Installations.