


4
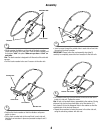
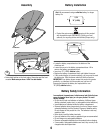
Back Crossbar
Side Rails
• While pressing the buttons on the ends of the back crossbar,
insert into the ends of the side rails. Push the back crossbar until
the buttons "click" into place. Make sure you hear a “click” on
each side.
Hint: The back crossbar is designed to fi t the ends of the side rails
one way.
• Pull the back crossbar to be sure it’s secure to the side rails.
2
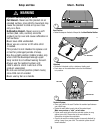
PRESS BUTTONS
• Position the front crossbar so that the vibration unit power
switch is down.
• Fit the front crossbar tabs to the small hole in each side rail.
Hold the front crossbar in place and proceed to steps 4 and 5
to fasten.
Side Rail Hole
Side Rail Hole
Front Crossbar
Power Switch
3
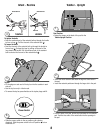
Assembly
• Insert a screw through the outside hole in each side rail and into
the ends of the front crossbar.
IMPORTANT! Please follow the next assembly step (step 5)
carefully to completely secure the front crossbar to the side rails.
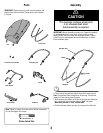
Screws
Retainer with Lock Nut
• Fit a retainer with lock nut onto the end of the screw and to the
inside of a side rail. Tighten the screw.
Hint: A lock nut has been factory assembled to the retainer. During
shipment, the lock nut may have fallen out of the retainer. If it
has, please fit it into the hexagonal hole in the retainer so that the
rounded side of the lock nut faces out.
• Repeat this procedure to fasten the screw in the other side rail,
using the remaining retainer with lock nut.
5
4