


22
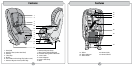
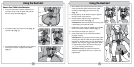
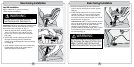
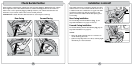
Rear-Facing Installation
Lap Belt Installation
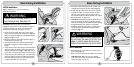
Figure 1 illustrates a typical rear-facing
vehicle lap belt installation.
IMPORTANT! When installing the restraint with
vehicle belts, store the lower hooks in storage
slots under cover (see page 16, Fig. 2.)
1. With the restraint in the reclined position,
place it rear-facing in the vehicle seat. Lift
up the seat cover to expose the rear-facing
belt path.
2. Pull to fully extend vehicle lap belt. Route
through rear-facing belts slot, behind the
buckle strap and through the other rear-facing
slot (Fig. 2).
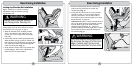
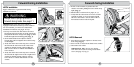
3. Verify that the vehicle belt is not twisted, then
buckle (Fig. 3). Pull on the vehicle belt to
make sure it is securely buckled.
3
1
2
Rear-Facing Installation
23
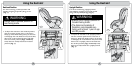
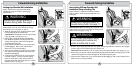
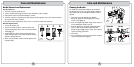
4.
Push the restraint firmly into the vehicle seat
while removing slack from the vehicle lap belt
(Fig. 4).
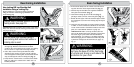
5. Verify that all connections are secure and the
restraint is stable. A secure restraint should
allow no more than 1 inch of side-to-side or
forward movement at the belt path
(see “Check
Buckle Position” on page 30).
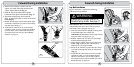
IMPORTANT! When correctly reclined, the red
line on the shell will be level with the ground,
and the back angle of the child restraint
should be approximately 45°.
If there is a
problem achieving the back angle, place a rolled
towel under the front of the base to help level
the restraint
(Fig. 5).
4
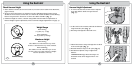
Only raise base as described above.
Do not raise the base off of the front
edge of vehicle seat; doing so will
reduce the protection for your child.
WARNING
Always use in reclined position in
rear-facing mode. See page 10.
WARNING
5