


36
37
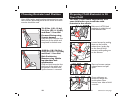
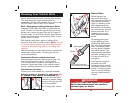
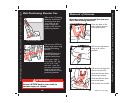
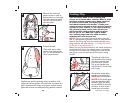
Remove the 6 harness
guides (shown in red) by
pushing down on one edge
with one hand and pulling
out from the front side
with the other.
3
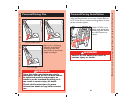
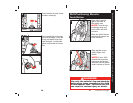
Pull pad off shell.
Clean with warm sudsy
water, rinse clean and air
dry. Do not use bleach or
other harsh cleaners.
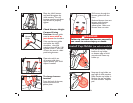
4
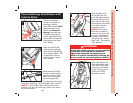
Replace seat pad by reversing order; lay pad on shell,
replace all harness guides, turn shell over to expose the
back, rehook elastic straps, and replace armrest covers.
Rethread harness (see belt-positioning booster section).
continued on next page.
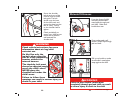
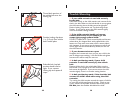
1
2
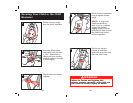
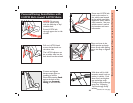
Thread both vehicle lap
and shoulder belts through
the slot (as shown) and
out other side. Buckle.
Pull up on shoulder belt
until all slack is out and lap
belt is tight.
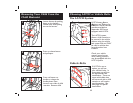
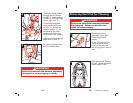
Grasp both vehicle belts
together just behind the
buckle plate and unbuckle.
NOTE: If the buckle plate
ends up behind the child
restraint, grasp the belts
to the outside of the child
restraint, as close to the
buckle plate as possible.
Locking Clip
You will rarely need to use a locking clip
except for in some older vehicles. Built in child
restraint locking systems have been required
in vehicles since 1996, and many vehicles
had these features even earlier. Check your
vehicle owner’s manual to learn how to use the
systems in your vehicle. If you need a locking
clip, please go back to the store where you
purchased this child restraint and purchase
one or call us at 1-800-544-1108 to order
one. Locking clips from any child restraint
manufacturer are okay to use.
NOTE: You do not need a locking clip when using this
seat as a belt-positioning booster, even with older vehicles.
Remove the locking clip when the vehicle seat belt is not
being used with the child restraint.
A locking clip will not
fix all types of seat belt problems.
Before you put your child restraint in the vehicle, buckle the
lap/shoulder belt. Pull on the lap belt portion. If it loosens
or slips, you must either use a locking clip to hold the seat
belt tight or move the child restraint to another seating
location.