


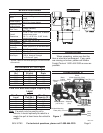


Page 8 For technical questions, please call 1-800-444-3353. SKU 91780
2.
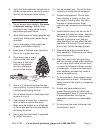
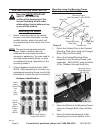
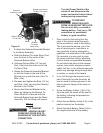
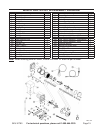
Solenoid Assembly
(34w)
Mounting Frame
(Sold Separately -
SKU 90476)
Figure 6
Unthread the nuts, spring washers and
washers from the four bolts on the base
of the Solenoid. Insert the bolts on the
base of the Solenoid Assembly (34w)
through the holes in the Mounting Frame
and secure in place by replacing the
washers, spring washers and nuts.
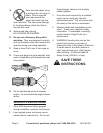
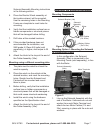
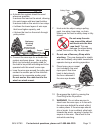
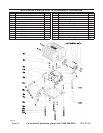
Mounting Option 2: Mounting the Solenoid
to the Solenoid Bracket (40w)
In this conguration, the Solenoid is
rotated so that the two short cables
attached to the Motor Terminals are
crossed and Solenoid Assembly
(34w) and Solenoid Bracket (40w) are
positioned over, and attached to, the
Motor.
1.
Figure 7
Solenoid
Assembly
(34w)
Solenoid
Bracket
(40w)
Bracket
Mounting
Holes
Motor
Motor Cables
(17s & 24s)
Battery Cables
(13s & 16s)
Bracket Tie-down
Strap (41w)
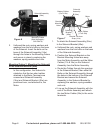
To attach the Solenoid Assembly (34w)
to the Solenoid Bracket (40w):
a. Unthread the nuts, spring washers and
washers from the four bolts on the base
of the Solenoid Assembly.
b. Position the Solenoid Bracket so the
Bracket Mounting Holes face away
from the Motor Assembly and the Motor
Cables (17s & 24s) on the Solenoid
Assembly face the Motor Assembly.
c. Route the Cables through the openings
in the Solenoid Bracket, then slide the
Bolts on the Solenoid Assembly through
the holes in the bottom of the Solenoid
Bracket and secure the Solenoid
Assembly to the Solenoid Bracket by
replacing the washers, spring washers
and nuts.
d. Line up the Solenoid Assembly with the
end of the Motor Assembly and attach
the two Motor Cables (24s) to the motor
terminals.