


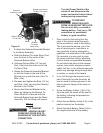


Page 7For technical questions, please call 1-800-444-3353.SKU 91780
Solenoid Assembly Mounting instructions
in the following section.
5. Place the Electric Winch assembly at
the location where it will be mounted.
Use the remaining holes in the Mounting
Frame as a template to mark holes for
mounting.
6. Verify that the installation surface has no
hidden components or structural pieces
that will be damaged before drilling.
7. Drill holes at the marked locations.
8. If the provided hardware does not
accommodate the installation, use
SAE grade 5 (Class 8.8) bolts (sold
separately), or higher, and torque to 35
ft-lb.
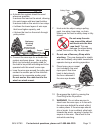
9. Attach the Hook to the loop at the end of
the Cable Assembly (36w).
Mounting using a different mounting plate:
1. The plate must be rated to at least the
winch’s capacity.
2. Place the winch on the vehicle at the
desired location, and mark the mounting
holes. Decide how the Solenoid and
Fairlead will be mounted and mount
them in place.
3. Before drilling, verify that the installation
surface has no hidden components or
structural pieces that will be damaged or
that could cause structural weakening.
4. Install the winch using the hardware
specied on the Specication chart.
5. Attach the Hook to the loop at the end of
the Cable Assembly (36w).
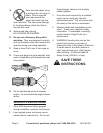
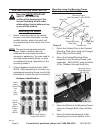
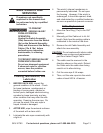
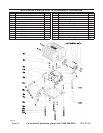
Mounting the Solenoid Assembly
Mounting Components
Figure 4
Solenoid
Assembly
(34w)
Solenoid Bracket (14s)
Motor
Motor Cables
(17s & 24s)
Battery Cables
(13s & 16s)
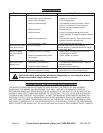
Mounting Option 1: Mounting the Solenoid
to the Mounting Frame
In this conguration, the Solenoid
Assembly (34w) is connected to the
Mounting Frame (sold separately), in line
with the Motor.
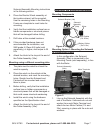
1.
Solenoid Assembly
(34w)
Motor
Cables
(17s & 24s)
Motor Terminals
Figure 5
Line up the Solenoid Assembly with the
end of the Motor. Unthread one nut and
washer from each Motor Terminal and
attach the two Motor Cables (17s and
24s), securing in place with the nuts and
washers.