


PAGE 6
STEP 6: INSTALL THE FACING
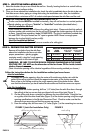
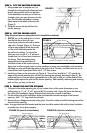
1. Cut the end pieces of the facing from the 2” x 6” pieces of lumber you used as the bridges. The
end facing pieces should be the same length as the width of the shutter opening.
2. Cut the sides of the facing from the 2” x 6” lumber. The length of the side facing pieces should
be equal to the length of the shutter opening plus 11” (two times the width of the 2” x 6”
lumber, which is actually 5 1/2” wide).
3. Use #12d common nails to anchor the facing pieces in place (Figure 6A Joist-Out or 6B
Joist-In). You are now ready to mount your Whole House Fan to its supporting ceiling frame.
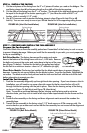
‰
1/2" DEFLECTION
STEP 7: PREPARE AND INSTALL THE FAN ASSEMBLY
Prepare the Fan Assembly
Cool Attic Whole House Fans are carefully packed and “assembled” at the factory in such a way as
to prevent shipping damage. Before you install the fan assembly in your attic, you must prepare the
fan by re-assembling it.
Belt Drive Models: The factory has secured the motor and motor
base to the bottom of the tubing frame with two 1/4-20 bolts. Remove
the bolts and remount the motor and motor base to the top of the cross
bars (Figure 7A below). Position the fan belt on the pulleys and adjust
the fan belt to a minimum tension—about a 1/2” deflection (at right).
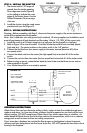
Direct Drive Models:
The factory has installed the fan blade upside down to prevent shipping
damage. Loosen the set screws holding the fan blade in place. Invert the fan blade. Retighten the
set screws. The blade must be firmly secured and the hub must be flush with the end of the shaft
before attempting to operate your fan.
Install the Fan Assembly
1. Push the fan assembly diagonally up through the shutter opening. If you have chosen a Joist-In
Installation, you will need to use some other attic access for the fan since the fan will not fit
through the shutter opening with the joist in place. Place the fan housing on top of the facing,
as shown in Figure 7A (belt drive) and Figure 7B (direct drive).
Note: To provide a good seal between the fan housing and the facing and to minimize
vibration noise, you may wish to install a felt strip or foam tape between the fan frame and the
facing.
2. Center the fan assembly on the facing and draw alignment marks around the wooden fan
assembly base.
3. Toenail the fan assembly to the facing using 2 1/2” deck screws or #12d common nails. Be
sure to check as you anchor each corner that the fan assembly has not moved off the alignment
marks you have drawn.
FIGURE 6A (Joist-Out Installation)
FIGURE 6B (Joist-In Installation)
facing pieces facing pieces
FIGURE 7A (Belt Drive Model)
FIGURE 7B (Direct Drive Model)
hub must be flush with end of shaft