


PAGE 5
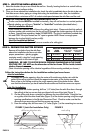
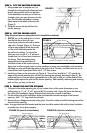
STEP 3: CUT THE SHUTTER OPENING
1. Using a saber saw or keyhole saw, cut
through the ceiling along the lines you have
drawn, being careful not to cut the joists.
To be absolutely sure that you will not cut
through a joist, you may also use a circular
saw with the shoe adjusted to a cutting
depth equal to the depth of the drywall.
(Figure 3)
2. Carefully remove the drywall from the
shutter opening.
STEP 4: CUT THE CEILING JOIST
1. BEFORE you cut the ceiling joist, it is best
that the joist from which you are
removing a section be secured on either
side with a “bridge” (Figure 4). Doing so
will give extra support to the joist as you
cut it and will also help prevent the
drywall from cracking. To secure the
joists you may use the 2” x 6” pieces of
lumber that you will use later to construct
the facing. Place the bridge pieces
perpendicular to the joists about 6”
outside the sides of the shutter opening,
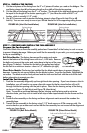
STEP 5: FRAME THE SHUTTER OPENING
1. To frame in the shutter opening you will use lumber that is of the same dimension as your
ceiling joists (i.e., 2” x 6”, 2” x 8”, etc) and #12d common nails. Figure 5A shows the framing
for a Joist-Out Installation; Figure 5B shows the framing for a Joist-In Installation.
2. On the ceiling side of the installation fasten the sheetrock around the edges of the framed
opening. Use 1 1/2” ring shank drywall nails.
3. Remove the two bridges across the ceiling joists. Save this lumber to build the facing around the
framed shutter opening.
Note: Any gaps between the headers and the joists should be sealed with caulk or foam insulation
to enable your fan to draw properly.
being sure to allow enough room to use a handsaw or power saw comfortably and accurately.
Although you may nail the bridge pieces to the joists with #12d nails, it will be easier for you to
remove them later if you fasten them with 2 1/2” deck screws.
2. Mark the cut lines on the joist to be cut (Figure 4). The cut lines should be 1 1/2” outside the
edges of the shutter opening (this will allow for framing the opening, described in Step 5). Be
certain that the cut lines are square (perpendicular to the joist) so that you will be able to fit the
headers tightly against the joist and the shutter opening. After carefully measuring and marking
each cut line, you may cut the joist.
(Skip this step if you are using the Joist-In Installation method.)
FIGURE 3
bridge pieces
ceiling joist marked and cut 1
1/2"
outside the edges of shutter opening
FIGURE 4
FIGURE 5A (Joist-Out Installation) FIGURE 5B (Joist-In Installation)
framing pieces framing pieces