


PAGE 4
To prepare the shutter opening, align the center of the stationary shutter vein with the
center of the ceiling joist that crosses the approximate center of the shutter opening.
Draw a line on the ceiling marking the rough opening size of the shutter frame. Make
sure that the dimensions you have marked are accurate and that the corners are square.
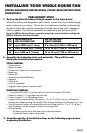
STEP 1: SELECT THE INSTALLATION SITE
1. Select the location for your new Whole House Fan. Usually, locating the fan in a central hallway
produces the most uniform airflow.
2. Once you have selected the installation site, check the attic immediately above the site to be sure
that there are no ducts, piping or wiring obstructing the installation area. Also, the installation
site should allow a minimum of 36” of unobstructed space between the attic floor and the roof.
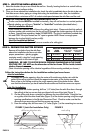
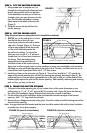
STEP 2: PREPARE THE SHUTTER OPENING
1. To prepare the shutter opening, drill two 1/4” holes (from the attic floor down through
the ceiling) at the two corners that are aligned with one of the joists (Figure 1).
2. On the ceiling side, draw a straight line between the two drilled holes. Using this line
as a guide, mark the other three sides (Figure 2) of the shutter opening using the rough
opening specifications in the Shutter Dimension Chart. Check to make sure that the
dimensions are accurate and that the corners are square.
3. From the ceiling side, drill two more 1/4” holes (Figure 1) at the remaining two corners.
FIGURE 1 (Joist-Out Installation Only) FIGURE 2
(Note: the shutter opening will be identical regardless of the mounting method you choose.)
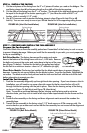
Joist-In Installation Method
If you choose this method, you will leave the ceiling joists intact. Please note that this method
requires another attic access since the fan will not fit through the shutter opening with the joist
in place. Special Note regarding Model CX36BD2SPD: The Joist-In Installation method may
be used ONLY if the joist centers are 24” apart or greater AND if there is enough space
between the involved joist(s) and any wall(s).
Joist-Out Installation Method
If you choose this method, you will remove a section of a ceiling joist.
READ THE FOLLOWING BEFORE PROCEEDING WITH STEP 2:
The fan and shutter MUST
be installed horizontally; they will not function in a vertical position.
Decide whether you will use a “Joist-In” or “Joist-Out” installation (described below):
Follow the instructions below for the installation method you have chosen.
drill first two holes from attic
drill second two holes from ceiling
mark ceiling
OR
Joist-In Installation
Joist-Out Installation
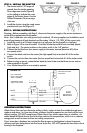
SHUTTER DIMENSION CHART
ROUGH
OPENING
INSIDE SHUTTER
DIMENSIONS
OUTSIDE SHUTTER
DIMENSIONS
FAN
SIZE
24" 23 3/4 x 25 1/2 28 x 29 3/4
30" 29 1/4 x 32 27 1/4 x 29 3/4 31 1/2 x 34
36" 37 1/4 x 33 1/2 35 x 31 1/4 39 1/4 x 35 3/4
Remove all insulation from the attic floor
above the installation site (be sure to take
proper precautions—gloves, goggles,
respirator mask), using the "rough opening
to cut" dimension in the chart at right.
WARNING: BE SURE TO USE THE ROUGH OPENING DIMENSIONS IN THE CHART
FOR THIS STEP. DO NOT use the dimension of the fan frame OR the inside/outside
shutter dimensions.
25 1/2 x 27 3/4