


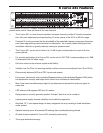
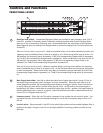
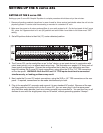


14
Using the S curve 231 to Remove Feedback
One of the most important applications for the S curve 231 is removing feedback from an onstage
monitor system. This procedure is sometimes called “ringing out,” since feedback usually begins with
a slight ringing sound at the resonant frequencies where the loop between microphone and speaker
is loudest. The advanced Constant Q circuitry ensures that adjacent program frequencies which may
not be causing any problems are unaffected even when attenuating problem frequencies by their
maximum amount.
To ring out a monitor system, start by setting up the stage exactly as it will be used during perfor-
mance, preferably with the performers themselves standing in front of the mics they will be using (this
is important since the physical placement of objects—or people—on the stage can affect the genera-
tion of feedback loops in different frequency areas). With power to all audio components turned off,
connect the S curve 231 to the monitor mixer, preferably at its main mix inserts (if these are not
available, connect the unit in-line, between the monitor mixer outputs and the monitor amplifier
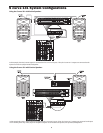
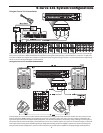
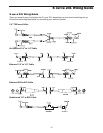
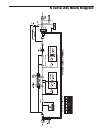
inputs). (See pages 8-10 in this manual for typical configuration diagrams.) Because you’ll only be
cutting frequencies, press the Cut Only switch so that it is on (in the down position). Also, because
you’ll want to be able to make deep cuts, set the Range switch so it is off (in the 12dB position).
Then raise all front panel Equalizer sliders to their upper-most position; because the Cut Only switch
is on, this represents flat response (no cut or boost).
Next, power up all audio equipment (turning on the amplifiers last) and, using one monitor output
only, gradually turn up the volume while a performer is speaking or singing into the primary mic for
that monitor. Continue slowly increasing the volume until a feedback howl just begins. Using your
ears or an RTA (Real Time Analyzer), identify the approximate frequency at which this feedback
occurs. Lower the corresponding Equalizer slider until the feedback disappears. Then continue
slowly turning up the volume until another feedback howl just begins. Again identify the approximate
frequency of this feedback and lower the corresponding Equalizer slider until the feedback disap-
pears. Repeat this procedure until you reach the point where many different frequencies begin to
feedback at once or when you find that you’ve already attenuated most of the feedback frequencies
that are occurring. This is the point at which the process stops—you’ve gotten as much gain out of
the monitor system as you can without adjusting the physical placement of the mic or monitor speak-
er. Repeat this procedure for each monitor output (each time using the primary mic for that monitor).
When done successfully, “ringing out” (which should be done before every performance) can add
another 3 to 15 dB more of usable gain to your monitor system—so it’s well worth the time and effort!