6
En
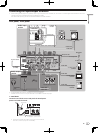
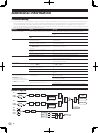
Connections
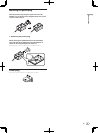
Be sure to turn off the power and unplug the AC adapter from the power outlet before making or changing connections between devices.
Wait until all connections between devices have been completed before connecting the AC adapter.
Only use the AC adapter included with this unit.
Refer to the operating instructions for the component to be connected.
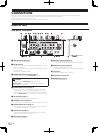
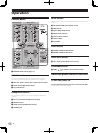
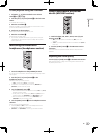
Names of Parts
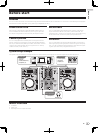
Rear panel, front panel
ON
DC IN
L
L
LINE PHONO
PHONO / LINE CD
CONTROL
SIGNAL
GND
RL
3 COLD
2 HOT
1GND
R
R
L
PHONO / LINE CD
CONTROL
R
L
R
1
23
OFF
CH-1 AUX
MASTER 1MASTER 2
MIC
LINE PHONO
CH-2
321 4 5 86 4 5 67 3 9
b dc a
e
1 ON/OFF switch (page 10)
Turns this unit’s power on and off.
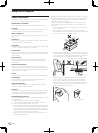
2 DC IN terminal
Connect to a power outlet using the included AC adapter (with the
power plug mounted).
Wait until connection of all equipment is completed before connect-
ing the AC adapter.
Only use the included AC adapter.
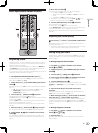
3 PHONO/LINE selector switch (page 7)
Switches the function of the [PHONO/LINE] terminals.
!
CAUTION
When switching the [PHONO/LINE] selector switch, set
[MASTER LEVEL] to [-∞]. Note that noise may be generated and
sound output at a high volume.
4 PHONO/LINE terminals (page 7)
Connect a phono level output device (analog player (for MM car-
tridges), etc.) or a line level output device (DJ player, etc.) here.
Switch the terminals’ function according to the connected device
using the [PHONO/LINE] selector switch on this unit’s rear panel.
5 CD terminals (page 7)
Connect to a DJ player or other line level device.
6 CONTROL terminal (page 7)
Connect using a control cord (included with Pioneer DJ players).
7 SIGNAL GND terminal (page 7)
Connect an analog player’s ground wire here. This helps reduce
noise when the analog player is connected.
8 AUX terminals (page 7)
Connect to the output terminals of external devices (computers,
portable audio sets, TVs, synthesizers, etc.).
9 MIC terminal (page 7)
Connect to a microphone.
a MASTER 1 terminals (page 7)
Connect powered speakers, etc., here.
! Compatible with XLR connector type balanced outputs.
b MASTER 2 terminals (page 7)
Connect powered speakers, etc., here.
! Compatible with RCA pin-jack type unbalanced outputs.
c Cord hook
Hook the AC adapters’ power cord here.
d Kensington security slot
e PHONES jack (page 7)
Connect headphones here.