


14
En
Additional information
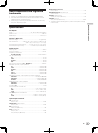
Troubleshooting
! Incorrect operation is often mistaken for trouble or malfunction. If you think that there is something wrong with this component, check the points
below. Sometimes the trouble may lie in another component. Inspect the other components and electrical appliances being used. If the trouble
cannot be rectified after checking the items below, ask your nearest Pioneer authorized service center or your dealer to carry out repair work.
! This unit may not operate properly due to static electricity or other external influences. In this case, proper operation may be restored by turning the
power off, waiting 1 minute, then turning the power back on.
Problem Check Remedy
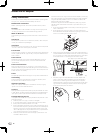
The power is not turned on. Is the included AC adapter properly connected? Connect the included AC adapter properly to the power outlet. (page 7)
Properly attach the included AC adapter’s power cord to this unit’s cord hook.
(Page 7)
Is the [ON/OFF] switch for power supply set to
[ON]?
Set the [ON/OFF] switch for power supply to [ON]. (Page 10)
No sound or small sound. Is the [CD, PHONO/LINE] input selector switch set
to the proper position?
Switch the [CD, PHONO/LINE] input selector switch to the channel’s input
source. (Page 11)
Is the [PHONO/LINE] selector switch on this unit’s
rear panel set to the proper position?
Switch the terminals’ function using the [PHONO/LINE] selector switch on this
unit’s rear panel. (Page 6)
Are the [TRIM], [channel fader], [crossfader]
and [MASTER LEVEL] controls set to the proper
positions?
Set the [TRIM], [channel fader], [crossfader] and [MASTER LEVEL] controls to
the proper positions. (Page 11)
Are the connected powered speakers, etc., prop-
erly set?
Properly set the external input selection, volume, etc., on the powered speakers,
etc.
Are the connection cables properly connected? Connect the connection cables properly. (page 7)
Are the terminals and plugs dirty? Clean the terminals and plugs before making connections.
Distorted sound. Is [MASTER LEVEL] set at the proper position? Adjust the [MASTER LEVEL] control so that the master level indicator’s orange
indicator lights at the peak level. (Page 11)
Is [TRIM] set at the proper position? Adjust the [TRIM] control so that the channel level indicator’s orange indicator
lights at the peak level. (Page 11)
Can’t crossfade.
Is the [THRU,
, ] (crossfader curve selector)
switch set to [THRU]?
Set the [THRU, , ] (crossfader curve selector) switch to a position other
than [THRU]. (Page 11)
Can’t fader start a DJ player. Is the [CH-1] or [CH-2] button in the fader start
section set to the off position?
Set the [CH-1] or [CH-2] button in the fader start section to the on position. (page
12)
Is the control cord properly connected? Connect this unit and DJ player with a control cord. (page 7)
Are the audio cables properly connected? Connect this unit to the audio output terminal of a DJ player with an audio cable.
(page 7)
Sound is distorted when an analog
player is connected to this unit’s
[PHONO/LINE] terminals.
Or, lighting of the channel level
indicator does not change even when
the [TRIM] control is turned.
Have you connected an analog player with a built-
in phono equalizer?
If the analog player is equipped with a built-in phono equalizer, connect it to the
[CD] terminals. (page 7)
If the analog player with built-in phono equalizer has a PHONO/LINE selector
switch, switch it to PHONO.
Is an audio interface for computers connected
between the analog player and this unit?
If the computer audio interface’s output is line level, connect it to the [CD]
terminals. (page 7)
If the analog player has a PHONO/LINE selector switch, switch it to PHONO.
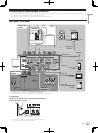
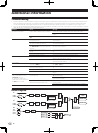
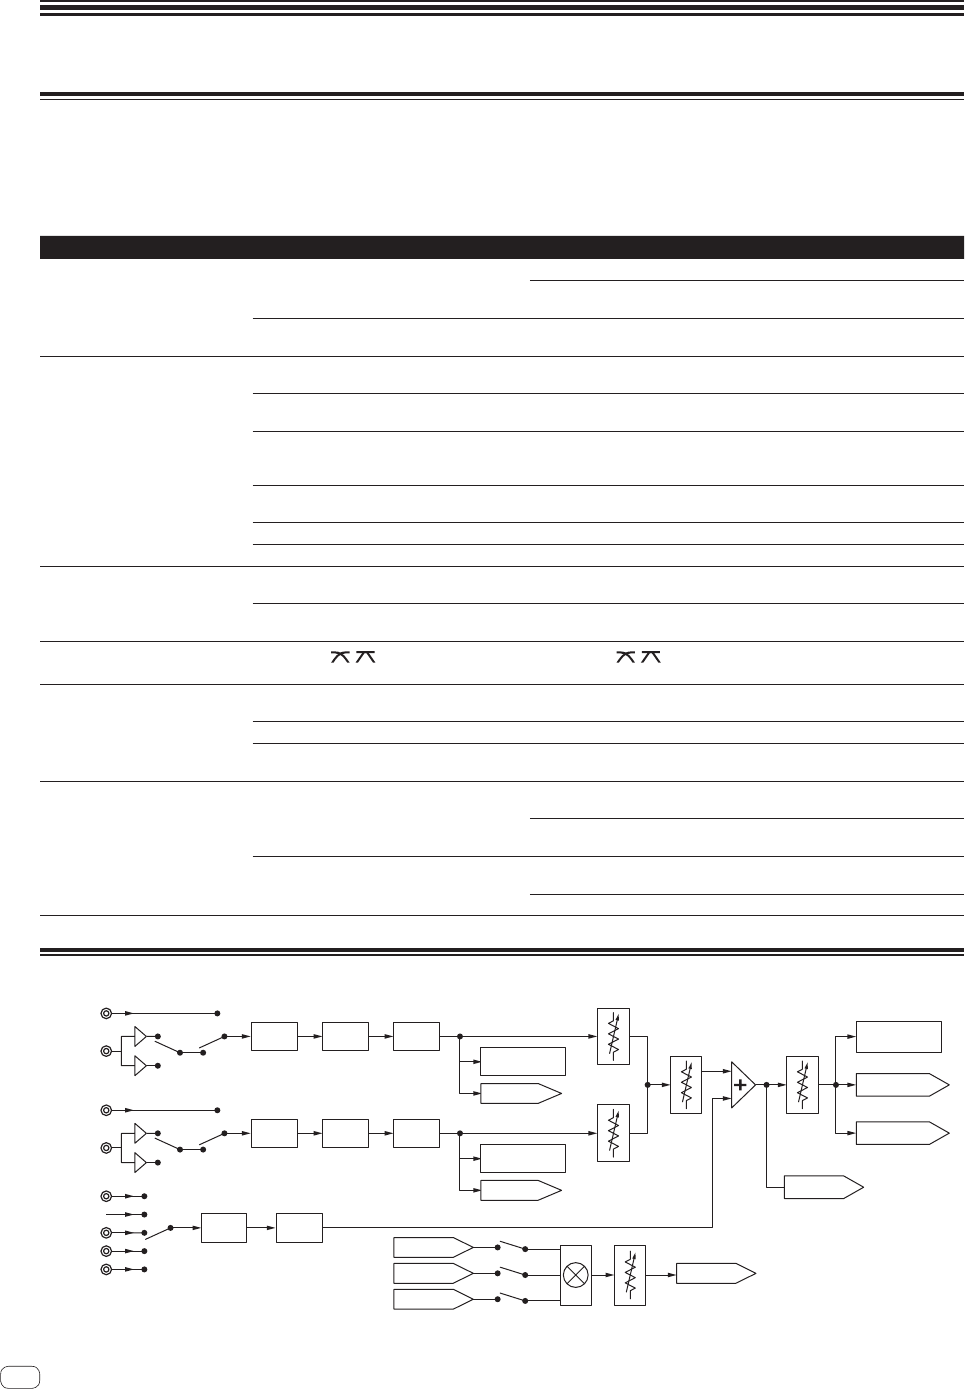
Block Diagram
2Band
EQ
LEVEL
3Band
EQ
TRIM
FILTER
3Band
EQ
TRIM
FILTER
MASTER LEVEL
METER
HP CH 1
CH 2
LEVEL METER
CH 1
LEVEL METER
HP CH 2
MASTER 1 OUT
MASTER 2 OUT
HP MASTER
HP MASTER
HP CH 1 HP OUT
HP CH 2
AUX 1
MIC
OFF
AUX 2
AUX 3
CD2
LINE2/
PHONO2
CD1
LINE1/
PHONO1
CH 1
FADER
CROSS
FADER
MASTER
VOL
CH 2
FADER
HP MIX
HP VOL