


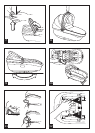


when set on a flat surface.
10• Navetta also becomes a regular crib that doesn!t
rock: simply pull out the incorporated stands as
shown in the figure.
ADJUSTING THE BACKREST
11• The height of the backrest can be adjusted by
pulling it up and turning the handle, as shown in
the figure.
ADJUSTING THE AIR CIRCULATION
12• The Navetta base features holes that can be
opened to allow air to flow into it from below.
To open the holes in the front of Navetta (the side
where the hood is located), push the two hooks
toward the outside.
13• To open the holes from the rear (the side opposite
the hood), push one of the two hooks toward the
outside.
REMOVABLE LINING
14• To remove the hood, unbutton it from the sides
and slip it out of the hooks.
15• To remove the lining, unbutton it from the sides
and slip it off the front.
16• Unbutton the lining from the back and remove it.
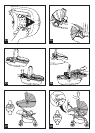
ATTACHING AND DETACHING THE BASSINET UNIT
ON STROLLERS
The Navetta Bassinet Unit is equipped with
the Ganciomatic System, to attach it to the
Ganciomatic hooks on the Pliko P3, GT3 and
Centro.
17• To attach the bassinet unit to the stroller,
consult the user!s manual to see how to raise
the Ganciomatic hooks on the stroller. Place
the bassinet unit turned towards you, and push
downwards until it clicks.
18• To detach the bassinet unit from the stroller, push
the handle (on the opposite side from the hood)
sideways then upwards, while lifting the bassinet
unit by the handle.
USING NAVETTA IN THE CAR
19• Navetta is designed to turn into Navetta AUTO
when you use the two hooks (shown in the figure)
together with the special Auto Kit that is available
for purchase separately.
BASSINET UNIT/STROLLER
• When the baby is bigger, the lining can be
removed from the bassinet unit and used as a
spare sack with a cover for the stroller.
• Remove the lining from the bassinet unit.
20• Slip the bassinet unit lining over the stroller seat,
as shown in the figure.
21• Unfasten the stroller safety belt and slip it through
the openings in the bassinet unit lining.
• The safety lap belts go through the two outer side
openings.
22• Tuck the bassinet unit lining around the stroller
footboard, as shown in the figure. Fold the top
part of the lining over the back of the stroller, as
shown in the figure.
23• Button the lining at the sides, as shown in the
figure.
24• Turn the lining cover down over the front bar,
fastening it to the zipper tabs at the sides with the
Velcro fasteners.
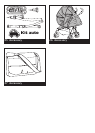
ACCESSORY LINE
25•
Navetta Auto Kit: Request the auto kit (ECE
R44/04 certified), which contains everything you
need for mounting the bassinet unit in your car.
26• Cover All Rain Canopy: Rain canopy made of clear
PVC, guarantees complete protection when the
• IMPORTANT: carefully read instructions and keep
for future use.
The childʼs safety could be put at risk if the
instructions are not followed.
• PEG PEREGO reserves the right to make any
necessary changes or improvements to the products
shown at any time without notice.
Peg Perego S.p.A. is an ISO 9001 certified
company.
The fact that we are certified provides
a guarantee of our honesty for our
customers, and fosters trust in the
company!s way of working.
CUSTOMER SERVICE
If parts of the model are accidentally lost or damaged,
use only original Peg Perego spare parts. Contact
the Peg Perego Customer Service for all repair work,
replacements, information about products, and sale of
original spare parts and accessories, at the following:
tel.: 0039-039-60.88.213
fax: 0039-039-33.09.992
e-mail: assistenza@pegperego.it,
www.pegperego.com
Peg Perego is at the consumer's service, meeting
every need in the best way possible. This is why our
customers' opinions are so important and valuable
to us. We would be very grateful if you would kindly
fill in the CUSTOMER SATISFACTION QUESTIONNAIRE
after using one of our products. You will find the
questionnaire on the Internet at "www.pegperego.
com/SSCo.html.en-UK".
Please note any observations or suggestions you may
have on the questionnaire.
INSTRUCTIONS FOR USE
PACKAGING
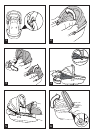
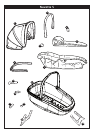
1• Before using the bassinet unit, remove the safety
hooks from the sides.
HOOD
2• To raise the hood, pull it up until both sides click
into place.
3• To lower the hood, press the two buttons on the
mounts and then push it downward as shown in
the figure.
4• When you open the zipper, the hood has a net
insert that guarantees better ventilation for your
baby and that allows you to see the baby from all
angles.
COVER
5• The cover can easily be attached or removed using
the zipper.
HANDLEBAR
6• To raise the handlebar, pull it up until it clicks into
place. The handlebar is locked only when it is in
the vertical position and the two blocks have been
inserted in their housings.
7• To lower the handlebar, release it by pushing
up the two blocks and then push the handlebar
downward.
8• The handlebar makes it easier to carry and hook
the bassinet unit onto the chassis and strollers.
POSITION OF ROCKER AND CRIB
9• The Navetta base is specially shaped so it will rock
EN•ENGLISH