


10 BASIC OPERATION
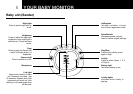
Once you have set up your Baby Monitor, you will be able
to hear the sounds in your baby’s room through the Parent
Unit. And also see the green and red sensor lights around
the top of the Parent Unit rise and fall with the sound levels.
Note:
If the connection between the Parent and Baby Units is
broken at any time the green Link light on the Parent Unit
will fl ash slowly, the parent unit will beep to alter you that
the link has been lost and the green and red sensor lights
will cease to react to any sounds. Move closer to the baby
unit or follow the directions in "Troubleshooting" chapter to
re-establish the link.
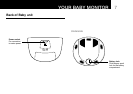
Power On/Off
Baby Unit
• Press [ ] key to turn on the unit.
•
The Green Link light comes on to show that the unit is
within range of the Parent unit.
• To switch Off, press [ ] key again.
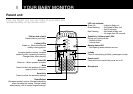
Parent Unit
• Press and hold [ ] key.The Link LED on the far left
will illuminate.
• Keep pressing the [ ] key until the 3 LEDs to the
far right illuminate as well. The Parent unit is now
switched on and will search for and link itself to the
Baby unit.
• To switch off, press [
] key until all lights turn off.
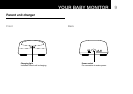
Changing Baby unit from battery to
mains power
• To conserve battery power on the Baby unit or when
the batteries are low or flat, plug the Baby unit into
the mains. If currently running on batteries and
switched on, changing from battery to mains power
will be instant and will not affect any of the settings.
• You can use the Parent unit to monitor baby while it
is charging.
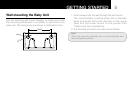
Monitoring
• Position the baby unit accordingly. It should be
placed at least 1 meter away from the baby.
• Take the parent unit to monitor.
• Audio picked up by the baby unit microphone is
depicted on the 7 lights on the parent unit (4 green and
3 red, covering a range of noise levels from 0dB up to
40dB.). The more audio is picked up, the more lights will
be lit. When no audio is picked up, all 7 lights will be off.