


B-SERIES TROWEL — PARTS & OPERATION MANUAL — REV. #0 (12/03/01) — PAGE 13
B-SERIES TROWEL — INSTRUCTIONS
NEVER start the engine with the throttle
above the idle position.
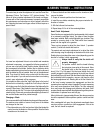
5. Grasp the control handle with left hand. Pull
slowly on starter rope until resistance is felt, then
pull briskly to start the engine. If the engine fails
to start after several tries, consult the engine owner’s manual.
6. After the engine starts, let it warm up by idling for a few minutes.
7. Test the safety kill switch. If you have the centrifugal type clutch,
try momentarily switching the kill switch to the OFF position. If your
safety kill switch is working properly, the engine on your finisher
should stop.
8. Get into the operator’s position behind the handle. With a secure
foothold and a firm grasp on the handles slowly increase the
engine speed until the desired blades speed is obtained. If your
finisher has a hand clutch, set your engine speed with the throttle,
then pull on the hand clutch lever to start the blades. Adjust the
blade speed after the hand clutch is fully engaged.
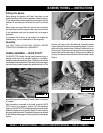
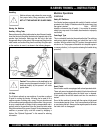
9. To maneuver the machine, gently lift up on or press down on the
main trowel handle. To move the machine to the operator’s left-lift
up on the handle, to move machine to the right-push down on the
handle.
10. The best method for finishing concrete is to slowly walk
backwards with the machine, guiding the machine from side to
side as you do so. See the diagram in than "Suggested Training
Checklist” at the end of this manual.
Always look behind you to avoid hazards
before moving backwards.
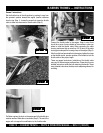
Cleanup
NEVER allow concrete to harden on the power trowel.
Immediately after use, wash any concrete off your trowel with
water. Be careful not to spray water on the engine. An old
paintbrush or broom may help loosen any concrete that has
started to harden.
Coat the blades and blade arms with diesel fuel after cleaning.
This should help prevent rusting and allow for easier cleanup in
the future.
Maintenance (Service, Adjustment and Repair)
Note: See the engine manual supplied with your machine
for appropriate engine maintenance schedule.
There is a “Daily Preoperation Check List” at the end of this
manual . Please feel free to make copies of it and use it on a daily
basis.
Maintenance Schedule
Daily (8-10 Hours)
Check the fluid levels in the engine and gearbox.
Weekly (50-60 Hours)
Relube arms, thrust collar and clutch.
Replace the blades if necessary.
Check and clean or replace the engine air filter as necessary.
Monthly (200-300 Hours)
Remove, clean, reinstall and relube the arms, thrust collar and
clutch.
Adjust the blade arms.
Yearly (2000-2500 Hours)
Check and replace if necessary the arm bushings, thrust collar
bushings, shaft seals and belts.
Check pitch control cable for wear.
SERVICE PROCEDURES
Checking Belt Tension
The first indication of belt wear is a reduced blade speed despite
the engine running at full speed. Inspect belts often for signs of
damage or excessive wear.
There is no method for manual adjustment of belt tension.
Excessively worn belts must be replaced.
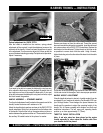
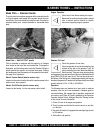
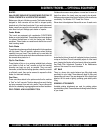
Blade Pitch Adjustment Procedure
The maintenance adjustment of blade pitch is an adjustment that
is made by a bolt on the arm of the trowel blade finger. This bolt
is the contact point of the trowel arm to the lower wear plate on the
spider. The goal of adjustment is to promote consistent blade
pitch.
There are some things to look for when checking to see if
adjustment is necessary. Is the machine wearing out blades
unevenly (i.e. one blade is completely worn out while the others
look new)? Does the machine have a perceptible rolling motion?
Look at the machine while it is running, do the guard rings “rock
up and down” relative to the ground? These are some indications
that the blade pitch needs to be adjusted.