


5
Pressing the x2 or ÷2 buttons has no effect on operation.
Pressing the DELAY button will put the unit into one of the two External Delay modes as
explained in the next section.
3.4 External Delay Modes – External Input Required
There are two External Delay modes: Phase Delay and Time Delay. In order to activate
these modes, the strobe must be in the External mode as indicated in the previous section.
To put the strobe in the Phase Delay mode or Time Delay mode:
1. Make sure the strobe is in External mode (see previous section).
2. Press the DELAY button. The display will show PHASE – TIME – OFF sequentially
as the DELAY button is pressed. When the display shows PHASE the strobe is in
the Phase Delay mode. When the display shows TIME the strobe is in the Time
Delay mode. When the display shows OFF the unit is in the External mode as
described in section 3.3. The LED in the top left of the DELAY button will be on
when the strobe is in the Phase Delay mode or Time Delay mode.
The display is extremely versatile in the External Delay modes. The flash rate can be displayed
in FPM or FPS, the Phase delay in degrees or the equivalent Time delay in seconds. The
internal microprocessor automatically computes between Phase delay and Time delay. Press
the DISPLAY button to cycle the display between FPM, FPS, PHASE, TIME, and a display of
the battery charge percentage that will automatically return to FPM after about 2 seconds. The
chevron below the display indicates which measurement is currently being displayed.
3.4.1 External Phase Delay Mode
In the External Phase Delay mode the user can delay the flash from 1 to 359 degrees
after a trigger from the external input. This enables the user to vary the stopped motion
image at any position (angle) without having to move the trigger source.
The user can vary the phase delay in increments as small as 0.1° using the black knob on
the left of the strobe. Changing the Phase is done in the same manner as changing the
flash rate (refer to section 3.1 Using the Knob.) There are some limitations to the Phase
delay at higher flash rates (refer to section 9.0 Specifications).
The Phase delay can be doubled or halved instantly by pressing the x2 or ÷2 buttons
respectively up to the maximum or minimum allowed.
3.4.2 External Phase Delay Mode – Auto Operation
There is a special mode of operation in the External Phase Delay mode called the Auto
mode. In this special mode, the user can set a phase step and a rate of increment and
have the Stroboscope automatically increase the phase delay at the set rate. This has the
effect of causing the object being viewed to appear to rotate in steps, giving a slow motion
effect to something that is rotating extremely fast. This effect is unique to the Phaser-
Strobe and opens new possibilities in the inspection and maintenance fields.
The External Phase Delay Auto mode is used to automatically change phase delay in
steps periodically to give a slow motion effect. A value stored in step determines the step
size in degrees. A value stored in rate determines the length of time between steps. Once
these values have been set, use the ON button to turn on the stepping. Using a small phase
step (<1 degree) and a small step rate (about 0.0100 seconds), a good slow motion effect
can be achieved.
To put the strobe in the External Phase Delay Auto mode:
1. Put the strobe in the External Phase Delay mode as explained in section 3.4.
8
For a two-point calculation the actual speed is given by:
RPM = AB/(A-B)
For a three-point calculation:
RPM = 2XY(X+Y)/(X-Y)
2
where
X = (A-B) and
Y = (B-C)
If a Remote Optical Sensor or Magnetic Sensor is used to sense one pulse per revolution (External
mode), the readout will display directly in RPM (FPM) without any adjustment required.
In instances when you can shut down the device and install a piece of reflective tape, then an optical
tachometer is easier to use for RPM measurement. Stroboscopes should only be used when you
can’t shut down the device. The human eye is not easily tricked into seeing a stopped image by
a stroboscope when the flash rate is slower than 300 FPM. Therefore, stroboscopes should not be
used below 300 FPM for inspection or to measure RPM.
6.0 LIMITATIONS OF REMOTE OPTICAL SENSORS (ROS-5P)
Remote Optical Sensors (ROS-5P) have a limitation when used with the Phaser-Strobe because
they sense not only the reflective marker but the strobe flash as well. If the ROS is positioned near
the strobe, the light from the strobe may cause the ROS to trigger the stroboscope at the wrong time,
especially when using a delayed flash mode. The Phaser-Strobe has an “Input Blanking” feature
to allow it to ignore this false trigger.
Even with the Input Blanking, large delays cannot be obtained using an ROS if the strobe’s flash is
triggering the ROS. The duration of the ROS pulse in response to the strobe’s flash is about 0.5
milliseconds to 1.1 milliseconds depending on the flash rate. This limits the largest delay possible
because the flash swamps the signal from the ROS, and consequently it will not provide the pulse
from the reflective marker. If large delays are desired, reposition the ROS so it is away from the
strobe’s flash or use a magnetic sensor.
The Input Blanking feature itself limits the maximum delay, which is detrimental to non-optical
sensors. It is possible to disable (or enable) the blanking in the Phaser-Strobe.
To toggle the Input Blanking on or off, press and hold the x2 button and then press the ÷2 button.
The display will show “BLANK” when Input Blanking is on and “NO BLK” when it is off.
7.0 LAMP AND FUSE REPLACEMENT
7.1 Lamp Replacement
WARNING: Before attempting to remove the lamp, make sure the stroboscope
is turned off and any mains cord is removed from the AC outlet.
Allow the lamp to cool waiting at least 1 minute.
The stroboscope is designed to discharge the internal high voltages within 30 seconds. However,
caution should be exercised when replacing the lamp.
The lamp can be replaced by using just a pocket screwdriver. It is not necessary to remove
any screws to replace the lamp. A new spare lamp is supplied with each new Phaser-
Strobe Kit.
To change the lamp:
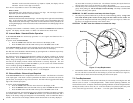
1. Push apart the two tabs on the side of the reflector housing and remove the front lens
using a small screwdriver to help pry one tab and lift the lens. Take care not to pry the tab