


6
2. Press the MEMORY/AUTO button until “AUTO” is displayed. (When in the
Auto mode, the ‘AUTO’ chevron is displayed.)
When the “AUTO” chevron displayed, the secondary (white) button functions are active.
These are STEP, RATE, ON, and OFF.
To adjust the step size, press the STEP button. The display will show “STEP” for a
second and then show the current step size in degrees (phase delay). The blinking digit is
the one affected by turning the knob. Adjust the step size using the knob in the same
manner you would adjust the flash rate (see section 3.1 Using the Knob).
To adjust the rate in seconds, press the RATE button. The display will show “RATE” for
a second and then show the current update rate in seconds. The blinking digit is the one
affected by turning the knob. Adjust the step size using the knob in the same manner you
would adjust the flash rate (see section 3.1 Using the Knob).
To begin the Auto Phase Delay, press the ON (DELAY) button.
To stop or freeze the motion at any time, press the OFF (EXT) button.
The MEMORY/AUTO button enables you to exit the Auto mode, store the current
settings or recall previously stored settings (see section 4.0 Memory).
3.4.3 External Time Delay Mode
In the External Time Delay mode the user can delay the flash from 0.0005 to 6.5 seconds
after a trigger from the external input. This enables the user to vary the stopped motion
image at any point in the cycle without having to move the trigger source.
The user can vary the time delay in increments as small as 0.0001 seconds (0.1 milliseconds)
using the black knob on the left of the strobe. Changing the delay time is done in the same
manner as changing the flash rate (see section 3.1 Using the Knob).
The Time delay can be doubled or halved instantly by pressing the x2 or ÷2 buttons
respectively up to the maximum or minimum allowed.
4.0 MEMORY - STORING AND RECALLING
The Phaser-Strobe can to store and recall up to three complete settings. This is exclusive of a
fourth setting that is stored each time the stroboscope is powered down, and automatically restored
each time it is powered up. Settings can be stored for comparative purposes or for special testing
purposes. Storing and recalling can be done in any of the four modes described in section
3.0 Operation.
4.1 Storing Settings
To store settings:
1. Repeatedly press the MEMORY/AUTO button until the display shows “STORE”.
The unit is now ready to store the settings in one of the three memory locations.
2. The numbers 1, 2 and 3 in the top right corner of the DISPLAY, DELAY and EXT
buttons respectively refer to the memory locations available. Press the 1, 2 or 3
button to save the setup for later recall.
Saved settings can be recalled at any time, even if the unit is powered down and left for years.
7
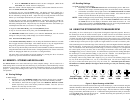
Stopped Image 1/4 times 1/2 times 1 time 2 times 3 times 4 times
Flash Rate (FPM) 875 1750 3500 7000 10500 14000
4.2 Recalling Settings
To recall previously stored settings:
1. Repeatedly press the MEMORY/AUTO button until the display shows “RECALL”.
The unit is now ready to recall the settings from one of the three memory locations.
2. The numbers 1, 2 and 3 in the top right corner of the DISPLAY, DELAY and EXT
buttons respectively refer to the memory locations available. Press either the 1, 2 or
3 button to recall and restore the previously stored settings.
NOTE: When recalling previously stored settings, the Stroboscope may be put into a different
mode that requires external inputs. Look at the EXT and DELAY button LEDs and
the AUTO chevron on the display to determine which mode the strobe is in. The
strobe can be put back in the Internal mode at any time by pressing the EXT button
and the LED in the top left of the EXT button will go out.
5.0 USING THE STROBOSCOPE TO MEASURE RPM
The primary use for a stroboscope is to stop motion for diagnostic inspection purposes. However,
the stroboscope can also be used to measure speed. In order to do this several factors need to be
considered. First, the object being measured should be visible for all 360° of rotation (e.g. the end
of a shaft). Second, the object should have some unique part on it, like a bolt, keyway or imperfection
to use as a reference point. If the object being viewed is perfectly symmetrical, then the user needs
to mark the object with a piece of tape or paint in a single location to be used as a reference point.
If the rotational speed is within the range of the stroboscope, start at the highest flash rate and adjust
the flash rate down. At some point you will stop the motion with only a single image of the object in
view. At a flash rate twice the actual speed of the image you will see two images. As you approach
the correct speed you may see three, four or more images at harmonics of the actual speed. The
first single image you see is the true speed. To confirm the true speed, note the reading and adjust
the stroboscope to exactly half this reading, or just press the ÷2 button. You should again see a
single image (which may be phase shifted with respect to the first image seen).
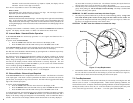
For example, when viewing a shaft with a single key way you will see one stationary image of the
key way at the actual speed and at 1/2, 1/4, etc, of the actual speed. You will see 2 images of the
key way at 2 times the actual speed, 3 key ways at 3 times, etc. The FPM equals the shaft’s
Revolutions Per Minute (RPM) at the highest flash rate that gives only one stationary image
of the keyway.
Figure 5 Object Rotating at 3500 RPM
If the rotational speed is outside the full-scale range of the stroboscope, it can be measured using the
method of harmonics and multi-point calculation. Start at the highest flash rate and adjust the flash
rate down. Be aware that you will encounter multiple images. Note the flash rate of the first single
image you encounter, and call this speed “A”. Continue decreasing the flash rate until you encounter
a second single image, and call this speed “B”. Continue decreasing the speed until you reach a
third single image, and call this speed “C”.