


4
increment would exceed the maximum, eg 32,000 to 33,000, the display will not
increment. Select a lower digit to increment.
There are two ways/modes to select a new blinking digit:
Knob 1 mode:
Push and hold in the knob and turn to select a new digit. The next digit to blink is
dependent upon the direction of the knob rotation.
Knob 2 mode (factory default):
Push and release the knob without turning it. The next digit to the right will be the blinking
digit. If the right most digit is blinking when the knob is pressed, the blinking digit will
wrap around to the left most digit. If the knob is turned when the knob is pressed in, the
existing blinking digit will be incremented or decremented and a new blinking digit will not
be selected.
To change between Knob 1 and Knob 2 modes, press and hold the DISPLAY and x2 buttons
together. The display will show Knob 1 or Knob 2 to indicate the new knob mode.
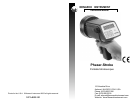
3.2 Internal Mode - Standard Strobe Operation
In the Internal mode the stroboscope generates it’s own signals and functions like a
regular stroboscope.
To put the strobe in Internal mode:
1. Press the AUTO button until the AUTO chevron in the display is off.
2. Press the EXT button until the LED in the top left of the EXT button is off.
In the Internal mode the flash rate can be adjusted using the black knob on the left of the unit
(see section 3.1 Using the Knob). The current flash rate is shown on the display.
The flash rate can be doubled or halved instantly by pressing the x2 or ÷2 buttons respectively
up to the maximum or minimum allowed.
The flash rate can be displayed (and adjusted) in Flashes per Minute or Flashes per Second
(FPM or FPS). Press the DISPLAY button to cycle between FPM, FPS, and a display of the
battery charge percentage that will automatically return to FPM after about 2 seconds. The
chevrons on the display indicate which measurement is currently displayed. The unit
automatically computes between FPM and FPMS so you can set the rate in FPM and then
view it in FPS by pressing the DISPLAY button.
Since you can only delay in the External mode, pressing the DELAY button while in the
Internal mode will cause the error message “EXT ->” to be displayed.
3.3 External Mode - External Input Required
In the External mode there are no adjustments the user can make. The flash rate is a function
of the input signal. This mode is used to synchronize the flash to an external event (from an
optical sensor, for example) to stop or freeze motion. The flash will be triggered on the falling
edge of the external input pulse.
To put the strobe in External mode:
1. Press the AUTO button until the AUTO chevron in the display is off.
2. Press the DELAY button until the LED in the top left of the DELAY button is off.
3. Press the EXT button until the LED in the top left of the EXT button is on.
As in the Internal mode, the actual flash rate can be displayed in Flashes per Minute or Flashes
per Second (FPM or FPS). Press the DISPLAY button to cycle between FPM, FPS, and a
display of the battery charge percentage that will automatically return to FPM after about 2
seconds. The chevrons on the display indicate which measurement is currently displayed.
9
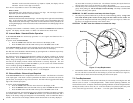
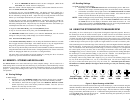
Red Dots
Notches
Figure 6 Lamp Replacement
any more than is necessary to free the lens. The reflector is held in place by the front lens
and will come loose, but is not necessary to remove the reflector.
2. Hold the lamp with a cloth between your forefinger and thumb and rock it back and forth
gently while pulling out. Do not attempt to rotate the lamp. The lamp is socketed and
will come out easily when pulled.
WARNING: Do NOT touch the new lamp with bare fingers.
3. The lamps are polarized and must be put into the socket matching polarity. Using a lint
free cloth, match up the red dot on the plug with the red dot on the socket and
gently rock the lamp back and forth while pushing it into place (see Figure 6). Make sure
the lamp is in straight and centered in the reflector hole.
CAUTION: Do NOT allow the reflector to contact the lamp.
4. Reinstall the reflector and then position the front lens in place matching up the notches on
the lens with the two small tabs on the housing to prevent lens rotation (see Figure 6).
Push the tabs on the front rim outward and press the lens into place.
7.2 Fuse Replacement
There is a 5 x 20 mm fuse inside the unit which may be accessed by removing the lens and
reflector (refer to section 7.1 Lamp Replacement). Under normal operating conditions, the
fuse should never blow. Examples of abnormal operating conditions would be foreign materials
entering the strobe, such as water, ink, etc. If the fuse needs to be replaced, replace only with
a fuse of the same type and value: Slow Blow - 3.15A fuse (part# 1062-3004-001).