


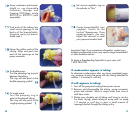
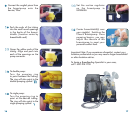


55 Push the pump connector into
the opening on the Lactina.
Rotate the connector assembly
to the right; make sure the tab
on the pump connector fits into
the slot in the pump housing.
66 Push the narrow section of the
piston into the rubber clamp of
the pumping arm on the
Lactina. Rotate the piston until it
fits snugly in the clamp.
77 Snap white membranes onto
yellow valves until membranes
lie completely flat.
Be sure to separate membranes
and valves when cleaning.
88 Push valves into place on
breastshield (if 1-piece breast-
shield) or on connectors
(if 2-piece breastshield).
99 If using the 1-piece breastshield,
go to step #10. Insert the small
end of the PersonalFit breast-
shield into the small end of the
Connector. (Prior to cleaning,
separate these two pieces.)
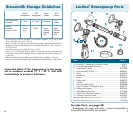
Full Assembly Instructions
Some pre-assembly may already be completed.
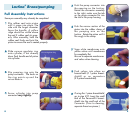
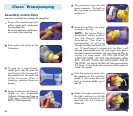
11 Slip rubber seal onto piston
until it snaps into place. The
side with the larger diameter
faces the handle. A yellow
ridge should be visible above
the seal if rubber seal
sits prop-
erly. After assembly,
hold the
rubber seal firmly and twist the
piston to ensure the seal is seated properly.
22 Slide vacuum regulator ring
onto cylinder, if not already
done. Push handle end of piston
into cylinder.
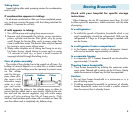
33 Slip pumping ring onto the
pump connector. The knob on
the ring points up and the
cut-out faces in.
44 Screw cylinder into pump
connector very tightly.
Lactina
®
Breastpumping
Vacuum Regulator Ring
98
Cut-out
Knob