


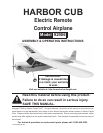

SKU 92906 For technical questions, please call 1-800-444-3353. Page 7
Setting up The Controls
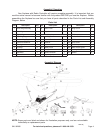
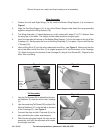
1. Tie the Ribbon (27) to the end of the antenna, as shown in Figure 5.
2. Make certain that your hands are clear of the Propellers and any moving parts. Push the Plane
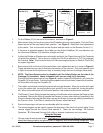
Speed control all the way toward the L position - see Figure 6. Move both trim adjustments
to the center. Turn on the switch on the Airplane and the switch on the Remote Control (11).
3. If the plane is adjusted properly, the rudder (on the Vertical Stabilizer (21) and elevators (on
the Horizontal Stabilizer (2)) should be straight and level.
4. If either the Rudder or Elevators are not straight and level, the Clips at the end of the Pushrods
(4) should be adjusted. This is done by turning the Clip IN (to shorten) or OUT (to lengthen)
the Pushrod. Note: This should be done with Servos energized (power to Radio & Plane ON)
for proper alignment.
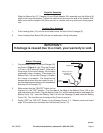
5. Each control stick on the front of the control has a trim adjustment next to it, shown in Figure 5.
These adjustments are used to fine-tune the position of the controls. They are typically used
in flight to ensure that the plane can stay at a steady height and can fly straight more easily.
6. NOTE: The Plane Speed control is disabled until the Safety Button on the side of the
Fuselage (3) is pressed. Leave it disabled until you are ready to fly the plane.
Pushing the plane speed control (see Figure 6) upward, toward the H position, will cause the
Propeller (9) to spin faster. Pushing the plane speed control back down, toward the L position,
will slow down and stop the Propeller (9).
7. The rudder control stick controls the plane’s left and right direction. Move the control stick right
to turn the rudder right, turning the plane right; and left to turn the rudder left, turning the plane
left. When the control stick is in the center position, the rudder should also be centered.
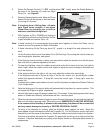
8. The Elevator Control Stick changes the position of the Elevator which causes the Plane to climb
or descend. Moving the Stick up causes the Elevator to more down making it possible for the
Plane to descend; moving the Stick down causes the Elvator to move up making it possible for
the Plane to climb. If the Stick is centered the Elevator should be level.
9. Practice these steps until you are comfortable with the controls.
10. The reverse toggles can be used to reverse the operation of the two front control sticks. Each
reverse toggle controls the Control Stick nearest it. There are two settings: “N”=Normal
Operation; “R”=Reversed Controls (left->right or forward->backward, and vice-versa).
Figure 5
Elevator
control
Rudder
control
“On/Off”
Battery
indicator
light
Remote
Control (11)
Elevator
trim
Rudder
trim
Reverse
toggles
control
stick
trim
adjustment
Figure 7
Elevator Controls
Figure 6
Back of Remote
Control (11)
Plane Speed
control
Ribbon
(27)
Flying the Airplane
1. Choose a day when the wind is light. The Ribbon (27) attached to the Remote Control antenna
should be blowing slightly (not greater than 30 degrees) and not be blowing straight out. Find
a wide-open field.
REV 08j