


SKU 92906 For technical questions, please call 1-800-444-3353. Page 5
Wing Assembly
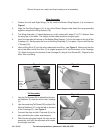
1. Position the Left and Right Wings (1a,1b) inside the Bottom Wing Support (1d) as shown in
Figure 1.
2. Align the Top Wing Support (1c) in top of the Bottom Support and fasten the wing assembly
together using the six Wing Screws (18).
3. The Wing Assembly (1) should balance on a flat surface with about 2” to 2
3
/
8
” distance from
the wing tips to the table. The height of both sides should be roughly equal.
4. Insert the two tabs at the back of the Bottom Wing Support (1d) into the holes on the top of the
Fuselage (3). Gently press the front of the Wing Assembly (1) into place. Secure with the two
1” Screws (20).
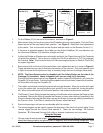
5. Hook a Wing Strut (5) into the tabs underneath one Wing - see Figure 2. Make sure that the
tab at the other end of the Strut (5) is angled properly to fit into the bottom of the Fuselage
(3). Attach the strut to the bottom of the Fuselage (3) using a Strut Screw (23). Repeat for the
other Strut and Wing.
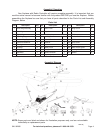
Set out all parts on a clear and level surface prior to assembly.
Figure 1
Left
Wing (1a)
Right
Wing (1b)
Bottom
Wing
Support
(1d)
Figure 2
Wing
Strut (5)
Left/Right
Wing (1a/1b)
Tail Assembly
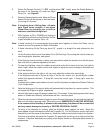
1. Use two Tail Screws (22) to attach the Horizon-
tal Stabilizer (2) onto the end of the Fuselage
(3).
2. Use the remaining Tail Screw (22) to attach the
Vertical Stabilizer (21) onto the tab on the end
of the Fuselage (3) - see Figure 3.
3. Connect the clips on both Pushrods (4) to the
tabs controlling the rudder and elevators.
4. With Servos energized adjust the clips on the
pushrods, until both the elevators and rudder
are straight and level.
Figure 3
Vertical
Stabilizer
(21)
Tail
Screw (22)
REV 08j