


SKU 92906 For technical questions, please call 1-800-444-3353. Page 6
Battery Charging
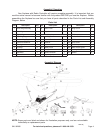
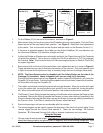
1. Plug the Battery Pack (14) into the Charger (15)
as shown in Figure 4, right. Plug the Charger
(15) into a 120V electrical outlet. Allow up to
three hours for the initial charge. Do not leave
unattended when charging. Disconnect the
Battery Pack (14) from the Charger (15) when
the charge is complete. The batteries will
become warm when they are ready for use. If
you feel them becoming overly hot, immediately
disconnect the Charger (15).
2. Make certain that the “ON/OFF” Switch for the
Airplane is in the “OFF” position. Turn the tabs at the edge of the Battery Cover (19) to the
side and remove the Cover. Plug the Battery Pack (14) into the socket located underneath the
Battery Cover (19). Insert the Battery Pack (14) into the Fuselage (3) and close the Battery
Cover (19). Turn the tabs over the edge of the Cover to secure it.
3. Switch “OFF” the “ON/ OFF” Switch on the Remote Control (11). Remove cover and insert
eight “AA” batteries (not included) into the Remote Control (11).
Battery
Pack (14)
Charger (15)
Battery Pack (14)
to Charger (15)
connection
Figure 4
Landing Gear Assembly
1. Push Landing Gear (10) into the slot located under the front of the Fuselage (3).
2. Insert Landing Gear Brace (26) into the slot and press it firmly into place.
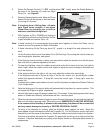
Propeller Assembly
Slide the Spinner Nut (7), Propeller (9), and Shaft Adapter (24) assembly onto the Motor’s (6)
shaft at the nose of the plane. Tighten the internal hex screw on the side of the Adapter (24).
Make sure that the Adapter (24) does not rub or interfere with any other part during opera-
tion.
IMPORTANT:
If damage is caused due to a crash, your warranty is void.
REV 06e