


11
10
Conforms to EN 1888:2003, EN 1888/A1-A2-A3:2005
INTRODUCTION
Read these instructions carefully before use and keep them for future reference, your childs safety may
be affected if you do not follow these instructions. The stroller is suitable from birth to approximately 3
years, 15Kg. The stroller features an adjustable reclining backrest, lockable front swivel wheel, hood,
raincover and shopping basket.
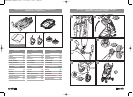
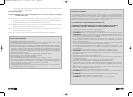
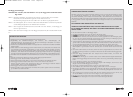
PREPARATION FOR USE
Unfolding the chassis
FIG 1. Remove all packaging materials from the chassis. Ensure the folding latch on the side of the
chassis is unfastened, there is only one. Lay the chassis on the floor with the seat facing
upwards and lift the handlebars towards you to unfold the stroller.
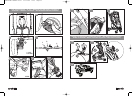
FIG 2. Pull the bar connecting the handles towards you to lock into place.
FIG 3. As the stroller opens, keep lifting the handlebars until you hear a click and the locks on both
sides are fully engaged.
Fitting the rear wheels
It may help to lay the stroller upside down so that the legs are easily accessible.
FIG 4. Slot the spindle on each rear wheel into the wheel joints on the chassis until they click into place.
Check the wheels are secure by gently pulling them away from the chassis.
To remove the wheels, simply press the silver release catches on the underside of the wheel hou-
sing and pull the wheels away from the chassis.
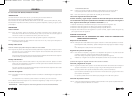
Fitting the front wheel
FIG 5. Slot the spindle on the front wheel into the wheel joints on the chassis. Push firmly until it clicks
into piace. Check the wheel is secure by gently pulling it away from the chassis.
To remove the wheel, simply press the silver release catch on the front of the wheel housing and
pull away from the chassis.
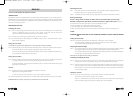
Harness
FIG 6. To attach the harness, insert both fasteners securely into the clasp.
Adjust each stra p length with buckles
To undo the harness, press the button on the c1asp to release the straps.
Your child should always be harnessed in and should never be left unattended even for short periods.
WARNING! Always use the crotch strap in combination with the waist belt.
Operating the brake
FIG 7. Push down firmly on the red brake pedal on the right hand side to engage the brake.
Check the brake is on by gently pushing the stroller.
FIG 8. To release the brake, simply press the grey pedal on the left hand side with your foot.
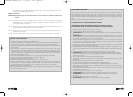
Brake System Adjust
Caution : Always check and adjust the brake cable to make both brakes work corrcectly
DO NOT overstep brake pedal Follow up below instructions to adjust brake system: (FIG. 9)
1. Remove the cover (A) to right side to uncover the adjusting nuts (B)
2. Screw the adjust nut to right side to tight brake pedals
3. Screw the adjust nut to left side to loose the brake pedals
4. After screwing the adjust nut into correct position, fix the fixing nut (C) to secure adjust nut.
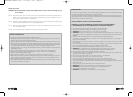
IN USE
WARNING: ENSURE BOTH SIDES OF THE FRAME ARE PROPERLY LOCKED TOGETHER BEFORE
USE
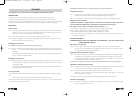
Locking the front wheel
FIG 10. Locking the wheel prevents the stroller from vibrating on uneven surfaees.
To lock the wheel, straighten it and push the loek down as shown in the diagram.
To unlock the wheel, simply flip the lock up again.
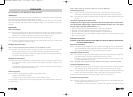
Adjusting the backrest height
FIG 11. To move the backrest up, pull the end ofthe webbing strap on the backrest, until the desired
seat height has been reached. It may help to gently lift the backrest whilst doing this.
To move the backrest down again, adjust the strap by lifting the tab on the slider and lengthe-
ning the strap. Gently lower the seat back down.
Warning! Do not adjust the seat with your ehild in it.
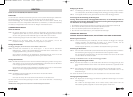
Attaching and adjusting the hood
FIG 12. Clip each end of the hood onto the bars on either side of the stroller's frame, ensuring that
the slot in the hood c1ip loeates onto the pin on the underside of the frame tube.
FIG 13. There are poppers and velcro on the baek edge of the hood. Attach the poppers to the pop-
pers found at the base of each handlebar and fasten the velcro to the velcro along the top
of the backrest. The hood can be pulled forward during use to help proteet your ehild from
wind or bright sunlight.
Fitting the raincover
FIG 14. Fit the raincover by placing it over the stroller with the hood fully extended.
Secure the raincover in place using the velcro patches.
There is a small window in the front of the raincover that can be opened by unfastening the
velcro around the edge, then rolled up and kept open with the fastener.
ENGLISH
ISTRUZIONI GINGER 759-01 12-11-2007 19:54 Pagina 10