


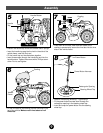
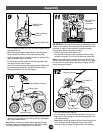

• Turn the vehicle frame upright.
• Fit the steering column (curved end down) through the
large hole in the cowling and the small rectangular hole
in the vehicle frame.
Hint: Before inserting steering column down through this
hole, locate the small rectangular hole in the vehicle
frame by looking through the large hole in the cowling.
• Insert the steering wheel with power button harness down
through the large hole in the cowling and the rectangular
hole in the vehicle frame.
Hint: Before inserting the power button harness through
this hole, locate the rectangular hole in the vehicle frame
by looking through the large hole in the cowling.
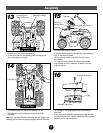
IMPORTANT! There are three electrical connections to be
made on this product. All three electrical connections must
be made in order for your product to function properly.
Please follow these instructions carefully.
• Carefully turn the vehicle frame over.
• Fit the power button harness connector into the motor
harness connector. This is the first electrical connection
Note: If the power button harness connector will not plug
into the motor harness connector, turn it over and try again!
Do not force the power button harness connector into the
motor harness connector.
11
10
12
Power Button Harness
Cowling
Large Hole
Power Button
Harness
Connector
Motor Harness
Connector
Steering Column
Large Hole
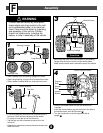
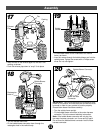
• Turn the steering wheel top over, so that the power button
harness faces up.
• Bend the power button harness down (near the power
button) toward the center of the steering wheel top.
• Insert the power button harness through the center of the
steering wheel bottom, as shown.
• Fit the steering wheel bottom to the steering wheel top
and align the four holes in each.
• Insert four screws through the steering wheel bottom and
into the steering wheel top. Tighten the screws with a
Phillips screwdriver. Do not over-tighten.
Assembly
10
9
Steering Wheel Top
Steering Wheel
Bottom
Power Button
Harness
Bottom View
Curved End
Vehicle Frame
Vehicle Frame