


7-5
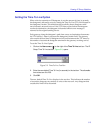
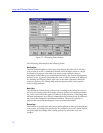
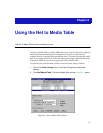
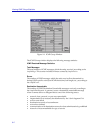
Using the IP Routing Table Window
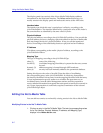
Modifying Entries in the IP Routing Table
1. Click in the Destination field, enter the desired destination IP address.
2. Click in the Next Hop field, enter the IP address that you want to specify as
the next hop of the route.
3. Click in the Route Metrics field(s), enter the desired metric value(s).
4. Click the desired option in the Route Type section.
5. Click Apply to accept the changes, or Cancel to exit the IP Routing Table
window without saving changes.
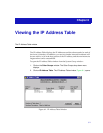
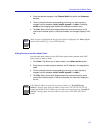
NOTE
The IP Routing Table window allows you to scroll through each entry in the table by
using the Prev and Next buttons at the bottom of the window. As you click on Prev and
Next to view each entry of the routing table, you can view the interface number associated
with that route entry in the Route Interface list box in the middle of the window. When
you get to the first or last entry, the Prev or Next button will be grayed-out, respectively.
If you have made a change to a route entry, and then click on Prev, Next, a message will
appear asking if you want to set the device with those changes. Click Yes to effect the
changes or No to disallow any changes that have been made.