10
| P a g e © Adam Equipment Company 2010
3.3 SETTING UP THE SCALES
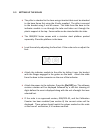
• The pillar is attached to the base using a bracket that must be attached
to the base frame first using the 4 bolts supplied. The pillar is secured
to the bracket using 2 sets of screws. The cable from the base to the
indicator module is run through the tube and taken out through the
plastic support at the top. Excess cable can be stored within the tube.
• The GBK/GFK Series comes with a stainless steel platform packed
separately. Place the platform in the base.
• Level the scale by adjusting the four feet. If the scale rocks re-adjust the
feet.
• Attach the indicator module to the pillar by sliding it over the bracket
with the flanges engaged in the groves on the base. Attach the cable
from the base to the connector on the rear of the indicator.
• Attach the power to the indicator. Press the [On/Off] key. The software
revision number will be displayed followed by a self-test showing all
digits before the zero is displayed along with the unit of weight that was
selected last.
• If the scale is an approved version, GBK/GFK..M, and the Calibration
Counter has been enabled (see section 6) the current values will be
displayed. These values should match the values marked on the scale
at the time of verification, if it has been verified.


