


15
RW 220 Vehicle Cradle Installation Guide
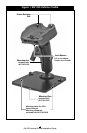
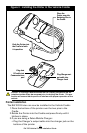
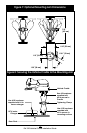
Mounting Arm the operator can easily load printing media, oper-
ate the printer’s controls and perform routine maintenance such as
cleaning the printhead. Follow these steps:
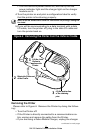
1. Select a location in the vehicle that will avoid personal con-
tact in case of an accident.
2. Turn the Cradle upside down and secure one of the mounting
flanges from the movable Arm to the bottom of the Vehicle
Cradle with the (4) #8-32 x 1/2” Screws supplied with the
Mounting Arm.
3. Secure the other mounting flange on the Movable Arm to
the desired mounting surface. The accessory kit supplies a
mounting plate with pre-drilled holes for securing the mount-
ing arm. The plate can then serve as a stable base if the
printer is being used in a non-vehicular application, such as
on a desk or table top.
Caution- Never use the RW 220 Vehicle cradle in conjunction with the
mounting arm and the mounting plate in a vehicle without securely attach-
ing it to the vehicle.
The mounting arm may also be directly mounted to a se-
cure surface, such as in a vehicle. You may use the supplied
#10-24 x 3/4” Screws and associated hardware supplied in
the Mounting Arm Kit or use other hardware as the mounting
conditions dictate.
Installing a Mobile Charger
If you are using a Zebra RCLI series Charger to charge the print-
er’s battery, use the supplied installation guide for instructions on
correct connection to a power source and the printer.
Accessory Kit AK17463-018 includes mounting hardware for se-
curing an RCLI series Charger to the supplied base plate.
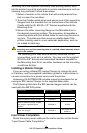
The following table lists the RCLI series chargers which can be
used with the RW 220 printer
DESCRIPTION MOBILE CHARGER P/N INPUT VOLTAGE
RCLI-DC Mobile Charger 12 VDC CC16614-1 12 VDC
RCLI-DC Mobile Charger 9-30V CC16614-2 9 to 30 VDC
RCLI-DC Mobile Charger 30-60V CC16614-3 30 to 60 VDC
RCLI DC Mobile Charger 12 VDC
(w/ plug for cigarette lighter
socket)
CC16614-9 12 VDC
RCLI-AC Charger CC16614-4
100 to 240 VAC;
50/60 Hz
Input Power Completion
Route the input power cable per the earlier section in this Guide:
“Input Power Cable Completion.”