


DON'T STOP THE FUN: always have
freshly charged, back-up batteries
on hand.
For your child’s safety: please read
and follow all instructions below
before operating.
• ATTENTION:
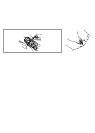
Check the fastening studs to be
sure they are tight.
2nd SPEED
Initially we suggest using only the
1st speed and the reverse gear.
Before moving into 2nd speed be
sure that the child has become
familiar with operating the vehicle.
• 1ST SPEED slow speed (beginner
drivers):
With both hands on the
handlebars, press down on the
accelerator pedal; the vehicle goes
forward at 2
1
/2 mph.
• 2ND SPEED fast speed
(experienced drivers):
With both hands on the
handlebars, press down on the
accelerator pedal; the vehicle goes
forward at 5 mph.
• BRAKE:
To stop, remove foot from
accelerator and press down on the
brake pedal.
Teach your child the proper use of
this vehicle for a safe and fun play
time.
• Before starting be sure that the
way is free from people and
objects.
• Drive with both hands on the
handlebar and keep your eyes on
the road at all times.
• Stop in time to avoid accidents.
• Use the 2nd speed only after your
child has the maturity and the
reflexes to operate the vehicle
safely.
CAUTION:
• In first gear, the vehicle has a
differential effect like real cars;
on smooth terrain and with one
child, the two wheels may turn
at different speeds
, resulting in
possible sliding/deceleration.
• When operating in overload
conditions, such as soft deep
sand, mud or rough uneven
terrain, the overload circuit
breaker will automatically
disconnect the power. After 10 or
more seconds,the circuit breaker
will automatically reset, however-
you must eliminate overload
conditions to resume normal
driving.
IF THE VEHICLE DOES NOT OPERATE?
• Check that all the plugs are properly
connected.
• Check electrical switches. Replace if
necessary.
• Check that the battery is connected
to the electrical system.
IF THERE IS NO POWER?
• Fully recharge the batteries.If the
problem persists,check with an
Authorized PEG PEREGO Service
Center.
•PEG PEREGO® le agradece que haya elegido este
producto.
Hace más de 50 años que PEG PEREGO lleva a
pasear a los niños:al nacer,con sus famosos coches-
cuna y coches de paseo,después con los fantásticos
vehículos de juguete a pedal y con batería.
•Lea atentamente este manual de instrucciones
para familiarizarse con el uso del modelo y enseñar
a su niño un modo de conducir correcto,seguro y
divertido.Conserve después el manual para
cualquier consulta futura.
•Nuestros juguetes respetan los requisitos de
seguridad previstos por el Consejo de la EEC,por el
“U.S.Consumer Toy Safety Specification F963”y
están aprobados por el T.Ü.V.y por el I.I.S.G.Istituto
Italiano Sicurezza Giocattoli.
•Peg Perego se reserva el derecho de aportar
modificaciones a sur productos.El precio,el manual
adjunto,los procesos o lugares de fabricación o una
combinación de estos factores pueden provocar
cambios sin previo aviso y sin que ello suponga
ninguna obligación para Peg Perego.
Años 3-7
Peso trasportable
75 lbs/34 kg
PRECAUTION:
LOS VEHICULOS ELECTRICOS NO
SON RECOMENDABLE PARA NIÑOS
MENORES DE 3 AÑOS. COMO
TODOS LOS PRODUCTOS
ELECTRICOS, CUANDO SE ESTA
MANEJANDO OBSERVE LAS
MEDIDAS DE PRECAUCION PARA
PREVENIR UN CHOQUE ELECTRICO.
EL CARGADOR ESTA INCLUIDO. 120
VOLTS, 60Hz, 30W DE ENTRADA, 12
VOLTS (DC) DE SALIDA.
PEG PEREGO ofrece un servicio de asistencia post-
venta,directamente o a través de una red de
centros de asistencia técnica autorizados,para
eventuales reparaciones o substituciones y venta
de recambios originales.Para contactar con los
centros de asistencia véase la parte de atrás de la
cubierta de este manual de instrucciones.
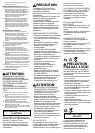
PRECAUTION:
REQUIERE MONTAJE DE UN
ADULTO.
ALGUNOS COMPONENTES AL SER
ENSAMBLADOS PODRÍAN TENER
PARTES PEQUEÑAS/RIESGO POR
BORDES CONTANTES.
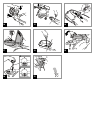
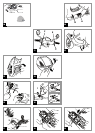
MONTAJE
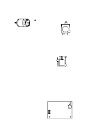
1 • Poner la moto boca abajo para poder trabajar
en el fondo.Quitar los dos casquillos del eje.
2 • Poner los estabilizadores como muestra la
figura.
3 • Fijarlos con los tornillos que se entregan con la
moto.
4 • Meter la rueda delantera en el eje poniendo la
parte con el casquillo de plástico hacia dentro.
5 • Meter en la herramienta adecuada un bullón y
fijar la rueda golpeando con el martillo a fondo.
6 • Meter el casquillo que sirve de soporte al
guardabarros en el eje hasta el fondo (foto B).
Nota:el casquillo está perfilado para poderlo
meter en un solo sentido (véase el detalle de la
ESPAÑOL
SERVICIO DE ASISTENCIA
PROBLEMS?
INSTRUCCIONES DE MONTAJE
RULES FOR SAFE DRIVING