


• IMPORTANT: read the instructions carefully before
using the stroller. Save the instructions for future
reference.
• PEG PEREGO reserves the right to make any
necessary changes or improvements to the products
shown at any time without notice.
Peg Perego S.p.A. is an ISO 9001 certified
company.
The fact that we are certified provides
a guarantee of our honesty for our
customers, and fosters trust in the
companyʼs way of working.
CUSTOMER SERVICE
If parts of the model are accidentally lost or damaged,
use only original Peg Perego spare parts. Contact
the Peg Perego Customer Service for all repair work,
replacements, information about products, and sale of
original spare parts and accessories, at the following:
tel.: 0039-039-60.88.213
fax: 0039-039-33.09.992
e-mail: assistenza@pegperego.it,
www.pegperego.com
Peg Perego is at the consumer's service, meeting
every need in the best way possible. This is why our
customers' opinions are so important and valuable
to us. We would be very grateful if you would kindly
fill in the CUSTOMER SATISFACTION QUESTIONNAIRE
after using one of our products. You will find the
questionnaire on the Internet at "www.pegperego.
com/SSCo.html.en-UK".
Please note any observations or suggestions you may
have on the questionnaire.
INSTRUCTIONS FOR USE
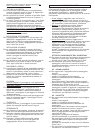
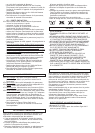
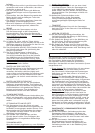
OPENING THE STROLLER
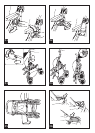
1• Before opening the stroller, remove the two
protective caps from the hooks, as shown in the
figure. Without this step, it is impossible to open
the stroller correctly.
2• The stroller can be opened using one hand only,
as follows. Place the stroller as shown in the
figure. Pull the lever, turn the knob, and lift the
handlebar. The stroller will automatically open up.
3• Check the side hooks, to make sure the stroller is
correctly opened.
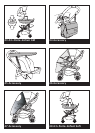
ASSEMBLING THE STROLLER
4• To mount the front wheels, lower Lever A and slip
the wheel onto the axle, pushing it in until it clicks
into place, as shown in the figure.
5• To mount the rear wheels, slip the wheels onto the
axle and push them in until they click into place,
as shown in the figure.
6• To mount the basket, press the buttons to pull the
basket rod out.
7• Slip the rod through the basket fabric. Insert the
rod with the basket into its housing, pushing in
until it clicks into place.
8• Slip the front openings on the basket over the side
hooks located under the stroller seat, as shown in
the figure.
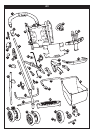
FRONT BAR
9• The stroller comes with caps on the armrests. To
attach the front bar, remove the caps first. (Keep
the caps, in case you want to use the stroller
without the front bar). To remove the caps, press
the buttons under the armrests while pulling the
caps off.
10• To mount the front bar, press the buttons while
slipping the front bar onto the armrests, as shown
in the figure. Push until the armrest clicks into
place. The armrest will now be in the second
position (2).
11• To place the front bar in the first position (1),
press the buttons under the armrests while
pushing the front bar towards the stroller.
12• To remove the front bar, press the two buttons
under the armrests while pulling the front bar out.
(The front bar will click into the second position).
Press the buttons again, and pull the front bar off
the stroller. The front bar can be opened on one
side only to allow the child to get in and out of the
stroller more easily when he is older.
HOOD
• The hood comes with a zipper, for attaching
the zip-on rain canopy or mosquito netting (see
Accessories Line).
13• To mount the hood, push the fittings down until
they click, as shown in the figure.
14• As shown in the figure, button the hood inside the
armrest and the backrest of the stroller.
15• To stretch out the hood, push the couplings
downward. The hood can be reclined by following
the inclination of the backrest.
16• To remove the hood, you must unbutton it from
the stroller, loosen the couplings and raise the
tabs of the fasteners, pushing towards the inside
of the stroller.
17• The hood, thanks to its reversible attachment
system, can also be installed on the part opposite
the handlebar. Before removing the hood to turn it
around, close it and bring it right forward to rotate
the fasteners, then detach it and reinstall it on the
opposite part; you can even rotate the fasteners
with your hands.
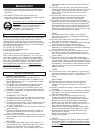
COVER
18• To attach the cover, join together its zip and the
one by the footrest, as shown in the figure. Unroll
the cover over the front bar, as shown in the
figure.
RAIN CANOPY
19• To mount the rain canopy, zip it to the hood.
20• Slide the elastic on the side of the stroller as
shown in the figure and button it to the rain
canopy.
21• Fasten the lowermost elastic of the rain canopy to
the wheel.
22• The handy rain canopy can be lowered by opening
the zipper. It can be left mounted on the stroller
with the elastic bands.
23• This rain canopy has been designed also for
strollers that have the Primo Viaggio car seat
mounted on them, to guarantee total protection.
• Do not use the rain canopy indoors and always
check to be sure that your child is not too hot.
• Do not place the PVC rain canopy near sources of
heat and pay attention to cigarettes.
• Verify that the rain canopy cannot interfere with
any moving mechanism of the chassis or stroller.
• Always remove the rain canopy before closing
your chassis or stroller.
• Wash with a sponge and soapy water without
using any detergent.
BRAKES
24• To set the brakes on the stroller, lower the pedal
on the rear wheels. To release the brakes, release
the pedal. Always set the brakes when the stroller
is not moving.
EN•ENGLISH