


4
Safety and convenience are the primary considerations in deciding
exactly where to locate your radio.
Caution: Be sure that the unit is located so that it does not interfere with the
driver, supplemental restraint systems (air bags) or impair access to any
controls. Connecting cables must be routed and secured in such a manner
as not to interfere with the operation of the brake, accelerator or other
controls. Interference from either the unit or connecting cables may
contribute to the loss of control of the vehicle.
Mechanical mounting.
Step 1: Heeding the caution, use the mounting bracket as a template for
marking the location of screw holes under the dash. Use an awl, nail or
other sharp pointed object to mark the hole locations.
Step 2: Drill a 1/8” hole for each screw hole in the mounting bracket. Attach
the bracket to the dash with the Phillips head sheet metal screws provided.
, Extreme care should be exercised when drilling into the dash to avoid damage to
under-dash electronic ignition, cruise control, instrument and / or accessory
wiring.
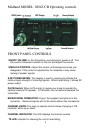
Step 3: Position the main unit between the bracket arms in line with the
retention knobs. Set the angle for optimum operating comfort and
accessibility.
Step 4: Tighten the retention knobs
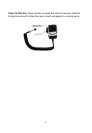
Power wiring (negative ground only).
Step 1: If you have not determined whether your vehicle has a negative or
positive ground, do so now. Then disconnect the negative lead from the
battery to prevent short circuits that can occur during wiring. Do not connect
this transceiver to positive ground electrical systems.
Step 2: With negative ground
A. Connect the positive (RED WIRE) the one with in-line fuse holder to either
the (a) fuse block, (b) cigarette lighter, or (c) directly to the positive post on
your battery.