


13
Owner’s Manual
Owner’s Manual
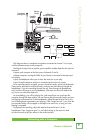
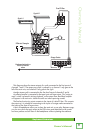
1. Power Switch
Pressthetopofthisrockerswitchinwards
toturnonthemixer.ThepowerLED[23]on
thetopsurfaceofthemixerwillglowwith
happiness.Pressthebottomofthisswitchto
putthemixerintostandbymode.Itwillnot
function,butthecircuitsarestilllive.
Toremovepower,eitherturnoffthemains
supply,orunplugthepowercordfromthe
mixerandthemainssupply.
Asageneralguide,turnonyourmixer
rst,beforethepoweramplierorpowered
speakers,andturnitofflast.Thiswill
reducethepossibilitiesofanyturn-on,or
turn-offthumpsinyourspeakers.
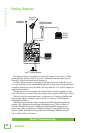
2. Power Connection
Pushthe3-pinfemalesideofthepower
adaptorsecurelyintotheconnectoronthe
rearofthemixer.Plugtheotherendinto
anACoutletproperlyconguredwiththe
correct voltage as indicated on the AC
adaptor.
OnlyusetheACadapterthatcamewith
yourmixer,orafactory-authorizedpower
supply.
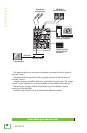
3. Mic Ins (Ch. 1–2)
Phantom-powered,balancedOnyxmic
preampsareoneveryVLZ4mixer.These
circuitsareexcellentatrejectinghumand
noise.Youcanpluginalmostanykindofmic
thathasastandardXLRmalemicconnector.
Professionalribbon,dynamic,and
condensermicswillallsoundexcellent
throughtheseinputs.The402VLZ4’smic
inputswillhandleanykindofmiclevelyou
cantossatthem,withoutoverloading.
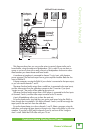
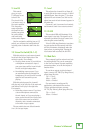
Phantom Power
Mostmodernprofessionalcondensermics
areequippedforphantompower,whichlets
themixersendlow-currentDCvoltageto
themic’selectronicsthroughthesamewires
thatcarryaudio.(Semi-procondensermics
oftenhavebatteriestoaccomplishthesame
thing.)“Phantom”owesitsnametoan
abilitytobe“unseen”bydynamicmics
(ShureSM57/SM58,forinstance),which
don’tneedexternalpowerandaren’t
affectedbyitanyway.
Thephantompowerforbothchannels1
and2isturnedonandofftogetherusingthe
phantompower[20]switch.
Never plugsingle-ended
(unbalanced)microphonesor
instrumentsintothemicinput
jacksifthephantompowerison.
Do notpluginstrumentoutputs
intothemicinputjackswith
phantompoweron,unlessyou
knowforcertainitissafetodoso.
Do notusephantompowerwith
ribbonmicrophones.
4. Line Ins (Ch. 1–2)
Theseinputssharecircuitry(butnot
phantompower)withthemicpreamps,and
canbedrivenbybalancedorunbalanced
sourcesatalmostanylevel.Youcanuse
theseinputsforvirtuallyanyaudiosignal
you’llcomeacross.
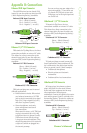
Toconnectbalancedlinestotheseinputs,
usea1⁄4"Tip-Ring-Sleeve(TRS)plug.
Toconnectunbalancedlinestothese
inputs,usea1⁄4"mono(TS)phoneplugor
standardinstrumentcable.
Thesetwolineinputsareagoodplace
toconnectolderinstrumentsthatneed
moregain.Youcancorrectweaklevelsby
adjustingthechannel’sgaincontrol[7].
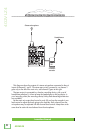
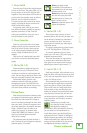
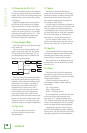
5. Low Cut (Ch. 1–2)
Eachlow-cutswitch,oftenreferredtoasa
high-passlter(alldependsonhowyoulook
atit),cutsbassfrequenciesbelow100Hzat
arateof18dBperoctave.
Werecommendthatyouuselow-cuton
everymicrophoneapplicationexceptkick
drum,bassguitar,orbassysynthpatches.
Theseaside,thereisn’tmuchdownthere
thatyouwanttohear,andlteringitout
makesthelowstuffyoudowantmuchmore
crispandtasty.Notonlythat,butlow-cut
canhelpreducethepossibilityoffeedback
inlivesituations,andithelpstoconserve
amplierpower.
Anotherwaytoconsiderlow-
cut’sfunctionisthatitactually
addsexibilityduringlive
performances.Withtheadditionoflow-cut,
youcansafelyuselowequalizationon
vocals.Manytimes,bassshelvingEQcan
reallybenetvoices.Troubleis,addinglow
EQalsoboostsstagerumble,michandling
clunksandbreathpops.Applyinglow-cut
removesallthoseproblems,soyoucanadd
lowEQwithoutblowingasubwoofer.