


6
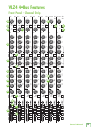
VLZ4 4•Bus
Set the levels
It’snotevennecessarytohearwhatyou’redoingto
setoptimallevels.Butifyou’dliketo:Plugheadphones
intothephonesoutputjack,thenturnupthephones
knobjustalittle.
1. Turnonthemixerbypressingthetopedgeof
thepowerswitch.
2. Foronechannel,pressthesoloswitchin,and
therudesololightwillturnon.
3. Playsomethingintothatinputatreal-world
levels.
4. Adjustthatchannel'sgaincontroluntilthe
rightmainmeterstaysaroundthe0dBLED
(marked“levelset”).
5. Disengagethechannel'ssoloswitch.
6. Repeatsteps2to5fortheremainingchannels.
7. Turnupthechannelfadertothe“U”mark.
8. Slowlyturnupthemainmixfaderuntilyou
hearthesignalsinyourheadphones.
9. Ifneeded,applysomechannelEQwisely.
10.Adjustthechannellevelstogetthebestmix.
Keepthegaincontrolsandlevelsfullydownon
unusedchannels.
11.Duringtheperformance,ifyounoticeachannel
OLLEDturningonduringpeaks,carefullyturn
downthatchannel'sgaincontroluntilOLdoes
notturnon.
Things to Remember
• Neverlistentoloudmusicforprolonged
periods.PleaseseetheSafetyInstructionson
page2forinformationonhearingprotection.
• Alwaysturndownthephoneslevelwhen
makingconnections,pressingsolo,ordoing
anythingthatmaycauseloudnessinthe
headphones.Thiswillhelpprotectyour
hearing.
• Alwaysturndownthemainmixleveland
monitor level when making connections
tothemixer.Betteryet,turnoffthepower.
• Whenshuttingdown,turnoffanypower
ampliersorpoweredspeakersrst.When
poweringup,turnthemonlast.Thiswill
reducethechanceofturn-onorturn-off
thumps.
• Savetheshippingbox!
Getting Started
Werealizethatyoumustbereallykeentotryoutthe
mixer.Pleasereadthesafetyinstructionsonpage2,
thenhavealookthroughsomeofthefeaturesand
detailsinthismanual.
Setup
Usethemixerinanicecleananddryenvironment,
freefromdryerlintanddustbunnies.
Zero the controls
1. Fullyturndownalltheknobstominimum,
exceptforthechannelEQandpancontrols,
whichshouldbecentered.
2. Makesureallbuttonsareintheoutposition.
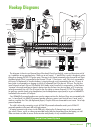
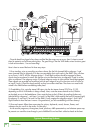
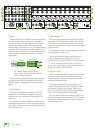
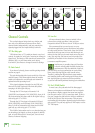
Connections
1. MakesuretheACpowerswitchisoffbefore
making any connections.
2. PushthelinecordsecurelyintotheIEC
connectorontherearpanel,andplugitintoa
3-prongACoutlet.Themixercanaccept
any
AC voltage ranging from 100 VAC to 240 VAC.
3. Plugabalancedmicrophoneintooneofthemic
XLR(3-pin)connectors.Orconnectany
line-levelsignal(keyboard,orguitarpreamp)
toalineinputjackusingaTSoraTRS
1/4"plug.
4. Ifyourmicrophonerequiresphantompower,
turnonthe48Vphantompowerbutton.
5. Allmonochannelshaveinsertjacksthatcanbe
usedtoconnectanexternaleffectsordynamics
processorintothesignalchain.
6. Connectthemainoutputsofthemixer(either
XLRorTRS1/4")tothelinelevelinputsofyour
amplier(withspeakersalreadyattached)or
tothelinelevelinputsofpoweredspeakers.