


The Big Caboose Stand-On Triple Instruction Manual
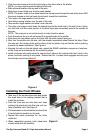
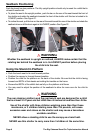
Installing the Front Wheels
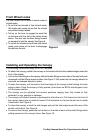
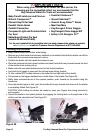
• Take one of the double wheel sets and locate
the small hole in the rotating bracket that is
inside the red lever.
• Push the front axle into this hole and keep
pushing the wheel set onto this axle until you
hear an audible click. See Figure 5.
• Pull downward on the wheel set to ensure that
it has locked into position on the axle.
• Repeat this same procedure for the other
wheel set.
• When assembled properly, both wheel sets
should rotate and roll smoothly.
Figure 5
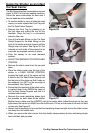
• Push the axle across and into the axle hole on the other side of the stroller.
NOTE: you may need to guide the axle into this hole.
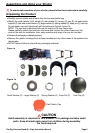
• Slide one small washer over one end of the axle.
• Next place a rear wheel over the the small washer.
NOTE: The brake teeth on the wheel should be facing inward toward the red brake lever AND
the arrow shapes on the tire tread should point toward the handlebar.
• Then place one large washer over the axle.
• Next slide a spring washer over the end of the axle.
• Take another large washer and slide it over the axle.
• Then take one snap pin and insert the straight leg into the small hole in the axle. Push it rmly
into this hole until the round portion of the other leg snaps completely around the outside of
the axle.
NOTE: The snap pin is curved (concave) to make insertion easier.
• Push the axle as far as it will go toward the opposite side of the stroller.
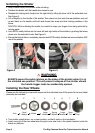
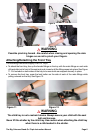
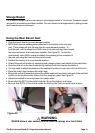
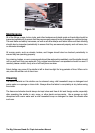
• Next place the red plastic cap on the oor with the solid surface facing up.
• Next turn the stroller onto its side, with the already assembled wheel toward the oor. Place
the axle onto the center of the solid surface of the red plastic cap so that the axle is pushing
upwards for easier installation. See Figure 4.
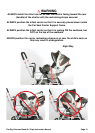
• Keeping the axle on the red plastic cap, repeat the SAME installation sequence of washers,
wheel, snap pin and hubcap for the remaining wheel.
• Install a hubcap onto each wheel by aligning the 5 tabs on the hubcap with the 5 slots in the
wheel, and then pushing it into place. Ensure that ALL 5 snaps have engaged securely and
the hubcap cannot be pulled off.
Page 3
Page 4
Figure 4