


D2
3
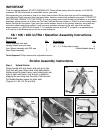
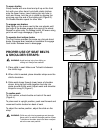
Step 2. Rear Wheel Assembly
Turn stroller onto its side. Grasp rear wheel in one
hand, slide wheel’s axle into hole in rear of frame.
Push up on the axle release lever so that the wheel is
fully inserted (Figure B). Check to see that the wheel
is properly inserted by pulling on the wheel firmly,
the wheel should not come off if fully inserted/locked.
Repeat for other side. To release wheel push up on
axle release lever and pull off wheel.
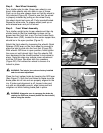
Step 3. Front Wheel Assembly
Turn stroller upright onto its rear wheels and then tip
stroller back so that the handlebar is down on the
ground and the front fork is up. The front brake Quick
Release lever (Q/R), located on the center support bar,
should be in the open position (Figure C).
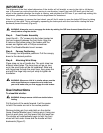
Attach the front wheel by loosening the wheel’s Quick
Release (Q/R) lever on the front wheel far enough to
allow the axle to slide into the front fork (Figure D1).
With wheel’s Q/R lever in open position, hand tighten
the cone nut until almost tight, then flip wheel’s Q/R
lever backward to the closed position to lock wheel in
place. Note this step may require minor adjustment
until the Q/R lever flips back with firm pressure
(Figure D2). Pull outward on wheel to ensure it is
locked in place.
WARNING: The interior jam nuts are factory installed
and do not need adjustment.
Close the front caliper brake by lowering the Q/R lever
(See Figure C). Spin the front wheel to make sure the
brake pads do not rub and are properly aligned to the
rim. If brake pad alignment is off, loosen brake pad
nut with an adjustable wrench, align brake pad and
retighten nut while holding brake pad in place.
WARNING: Always be sure to reengage the brake by
rotating the Q/R lever forward (toward the front wheel)
before using the stroller.
B
C
D1
Rear Axle
Axle
Release
Button
Brake
Pad
Cable
Cap
Cable
Adjustment
Nut
Locknut
Brake Cable
Cable Adjusting Sleeve
Q/R
Brake
Lever
Open Position
Closed Position