


11
•LATCH belt MUST stay tightly adjusted around car seat at all times.
• Only use the car seat LATCH System in vehicle seating locations designated by the vehicle manufacturer
for use with LATCH and that have an anchor spacing of 11 inches (280 mm).
•LATCH connectors must be secured to the vehicle LATCH anchors only. Connection to other vehicle
anchors or vehicle components could result in the anchor tearing free in a crash.
• Never attach more than one lower anchor connector to a vehicle lower anchor unless recommended by the
vehicle owner’s manual for that vehicle.
WARNING
DEATH or SERIOUS INJURY can occur
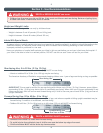
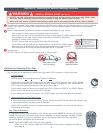
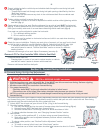
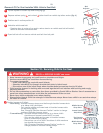
Refer to vehicle owner’s manual to identify the seating locations with LATCH System. Select
the seating location to be used and locate the vehicle lower anchors at the seat bight (fig. a).
LATCH Anchorages with 11 inch (280 mm) spacing may not be available in your
vehicle in the rear center seating position. If use of the rear center position is preferred,
use the vehicle seat belt to secure the car seat. See “Rear-facing Installation With
Vehicle Seat Belt” section.
After selecting a seating location, if vehicle seat back is adjustable, adjust seat back into most
upright position.
1
(fig. a)
2
Lower
Anchors
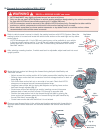
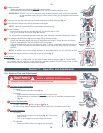
8b. Rear-facing Installation With LATCH
12
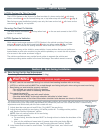
Route the lower anchor belt through the rear-facing belt path identified by blue
“Belt Here” arrows.
- Remove lower anchor belt and hook-on connectors from their storage location on
back of base (fig. b).
- Pull entire lower anchor belt out on one side of car seat. Check that LATCH
belts are not wrapped around shoulder harness adjuster strap.
- Lengthen lower anchor belt by tipping belt adjuster and pulling lower anchor
belt back through adjuster (fig. c).
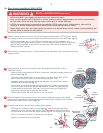
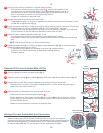
- Route lower anchor belt through rear-facing belt path in seat by inserting the
end of the lower anchor belt with the belt adjuster into the belt path opening
in seat identified by the blue “Belt Here” arrow and routing out through the
rear-facing belt opening on opposite side of seat.
- Center lower anchor belt and check that it is not twisted.
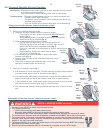
With seat adjusted into reclined position #1, place car seat rear-facing in the vehicle
seat location selected with rear-facing belt path toward vehicle seat back and centered
between the vehicle lower anchors (fig. d).
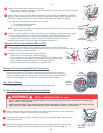
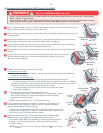
Connect lower anchor connectors to vehicle lower anchors.
- With hook-on connector opening facing down , position the opening of the
connector over the vehicle lower anchor. Push down and then pull out on
the connector to lock it onto the vehicle anchor (fig. e). You should hear a click.
- Pull on connector to be sure it is locked onto the anchor.
- Repeat for connector on opposite side.
3
(fig. c)
Lower
Anchor Belt
Belt
Adjuster
Pull
4
5
(fig. d)
Rear-facing
Belt Path
(fig. b)
Lower
Anchor
Connectors
(fig. e)
2
3
1
1
2 3
BELT
HERE