


4
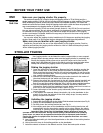
Make sure your jogging stroller fits properly.
The maximum capacity for a Chariot single child jogging stroller is 75 lb (34 Kg) and for a
double jogging stroller is 100 lb (45 Kg) including child and luggage or other supplies. The child’s
head, including any helmet, should not project above the sunshade assembly. The child’s feet
should not reach the front wheel. Using the jogging stroller with a child who does not properly fit
may cause damage to the jogging stroller, or possibly injure the child.
The maximum capacity of the rear mesh storage pocket is 1 kg (2.2 lb). Do not overload
the rear storage pocket. Do not attach additional carrying bags or other items to the back
or handlebars of the jogging stroller. Any additional weight on the back of the jogging
stroller could make it unstable. Additional cargo may be stored in the lower cargo pocket
to a maximum of 3 kg (6.6 lb).
You can also adjust the jogging stroller handlebars to fit the person pushing the jogging
stroller. Read page 12 of this manual before attempting to make these adjustments.
BEFORE YOUR FIRST USE
Make sure you are familiar with your jogging stroller.
Familiarize yourself with the use of the mechanisms on this jogging stroller. Practice
adjusting and walking the jogging stroller without a child in it before attempting to walk
with a loaded jogging stroller.
ONE
Guide for
Safe Use
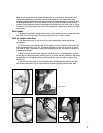
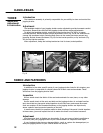
STROLLER FOLDING
Your jogging stroller can be folded for easier transportation or more compact
storage. Before storage, always make sure the jogging stroller is completely dry.
Storing the jogging stroller when wet or moist will cause rust to form on the
metal parts, and mildew will form on the fabric parts. Care must be taken when
folding and unfolding the jogging stroller to prevent finger entrapment.
Folding the jogging stroller.
1. Open the brake quick release lever. Remove the front wheel by moving the
quick release lever to the OPEN position as shown in the Wheels section.
When removing the wheel, the tire will rub the brake pads. Do not force the
tire through the brake pads. This may change the adjustment of the brakes.
Use a gentle wiggling motion.
2. Remove the rear wheels by depressing the button located in the center of
the wheel hub and pull the wheel out of the axle tube.
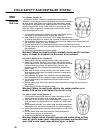
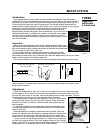
3. Remove the safety pin (located next to the left locking tension bracket) and
gently pull the auto lock spring clip (right locking tension bracket) out of its
hole as you pull the locking tension bar (Fig. 1) into its upper, unlocked position.
4. Fold the sunshade back, see Additional Features section for additional
information. Gently fold the handlebar forward, being careful not to catch or
pinch any of the running stroller’s fabric parts. (Fig. 2)
5. Lower the weight of the stroller gently backwards, allowing the wheel struts
to tuck forward.
6. If the wheels are removed: Attach the plastic clip on the handlebar to the
plastic D-ring near the bottom of the wrist safety strap. You may need to
gently compress the stroller.
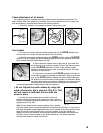
Unfolding the jogging stroller.
1. Detach the clip holding the stroller folded. Fold the wheel struts back (see Fig. 2)
2. Gently lift the handlebars up and back.
3. Partially lower the locking tension bar (see Fig. 1).
4. Now simply push down on the handlebars and the locking tension bar will
engage down into its stops, being careful not to entrap fingers, the safety
wrist strap or clothing. Having the parking brake engaged helps this process.
Important Note: Check that the handlebar height adjustment levers are
oriented in the same direction. During routine folding, transportation and unfolding,
these levers can move into an opposite orientation due to movement and vibration.
Forcing the stroller to upright when the levers face in opposite directions can cause
frame damage.
5. Insert the attached safety pin into the aligned holes on the side of the locking tension
bar and bracket.
6. Velcro the wrist strap to its holding position on the handlebar.
7. Install the wheels as shown in the Wheels section. Close the brake quick release.
Fig. 1
Fig. 2
Fig. 3
locking
tension bar
locking tension
bar bracket