


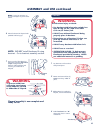
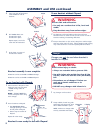

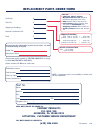

3 With vinyl side facing up,
insert two (2) “T-Fittings”
on changer into “T-Slots”
in bassinet and push down
to secure.
4 Push Triangular Tabs into
TriangularHoles in Playard
corners.
5 Secure changer to Playard:
• Pass Attachment Strap
through opening in corner
of side panel of Playard.
• Fasten strap to outside of
Playard.
Repeat for other strap.
6 Place storage pocket flap over
side of Playard.
NOTE: DO NOT place supplies
weighing more than 2.3 kg
(5 lbs.) in storage pocket.
Changer is now ready for use.
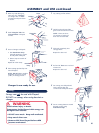
1
Lay canopy on flat surface.
2 Unfold rods and insert fiber
glass ends into aluminum ends.
NOTE: There are three
(3) sections of each rod
that must be extended.
3 Slide rod completely into
canopy fabric.
Repeat for other rod.
4 Pull end of Sleeve over rod and
release rod.
Repeat for other rod.
5 Set canopy over Playard and
insert canopy tabs into
curved slots of Playard corners.
6 Secure canopy bottom around
Playard corners using
Attachment Strips.
ASSEMBLY and USE continued
6
Triangular
Hole
T-Fitting
T-Slot
Triangular
Tab
Canopy
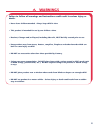
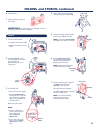
WARNING
Avoid serious injury or death:
Temperature inside Playard with canopy can
be higher than outside:
• DO NOT cover mesh. Keep well ventilated.
• Keep out of direct sun.
• Remove child from Playard before child
becomes overheated.
Canopy can only be used with Playard.
DO NOT use canopy when using bassinet or
changer.
Attachment
Strips
Sleeve
Attachment
Strap