


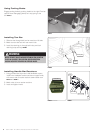

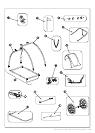

Hitching Trailer to Your Bicycle
Note: The Burley Forged Standard Hitch is used
for bicycles with either nutted axles
FIGURE 10 or
quick release assemblies
FIGURES 11 & 12
1. Remove axle nut or rear quick release lever
assembly from bike.
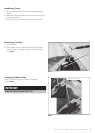
2. Match hole on flat side of hitch upper arm to left (non-chain ring
side) rear dropout hole, and place hitch flat against the dropout.
3. Loosely reassemble axle nut or quick release assembly through
hitch, dropout and wheel. Racks, bags, or fittings should not
interfere with hitch.
4. Slide flex connector between hitch side arms, and match holes.
5. Open retaining pin and insert through hitch and flex connector
holes from above. Close retaining pin.
6. Tighten axle nut or tighten and close quick release lever, with lever
pointing to rear of bike. A properly adjusted quick release lever
should leave an imprint on your palm when the lever is rotated
to the closed position. Verify that hitch is secure and cannot be
rotated by hand.
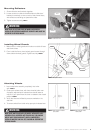
7. Wrap safety strap twice around inside of chain stay. Fasten hook
to D-ring on underside of tow bar end.
FIGURE 12
8. To remove trailer from bicycle, unfasten clip from D-ring and
remove retaining pin.
FIGURE 12: Forged hitch shown
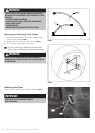
FIGURE 11: Quick release assembly
FIGURE 10: Nutted axle assembly
B UR LE Y HO NEY B EE O WN E R’ S IN ST RU CT IO N A ND SA FE TY MA NUA L 9
QUICK RELEASE LEVER MUST BE IN CLOSED POSITION AND
HITCH SAFETY STRAP PROPERLY INSTALLED. NUTTED AXLES
MUST BE TIGHTENED SECURELY. HITCH MUST NOT INTERFERE
WITH RACKS, BAGS OR FITTINGS. INSPECT HITCH AND TOW BAR
FREQUENTLY FOR DAMAGE OR LOOSE FASTENERS. DAMAGED OR
IMPROPERLY INSTALLED HITCHES OR INTERFERING PARTS CAN
CAUSE ACCIDENTS RESULTING IN SERIOUS INJURY.
WARNING
Quick Release Lever
Hitch Upper Arm
Retaining Pin
Flex Connector
Hook fastened to
D-ring under tow bar
Hitch
Nut
Hitch
Quick Release
Nut
Safety strap
wrapped twice
around chainstay