


Versa-Tether
®
Versa-Tether
®
2524
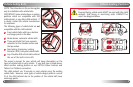
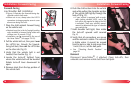
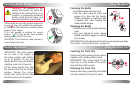
Using the Versa-Tether
®
Consult your vehicle’s owner’s manual for
approved tether-anchorage locations.
Locate tether on rear of restraint and remove
tether components from pouch.
Secure the child restraint by a seat-belt or
with the LATCH system.
Lift tether release tab; then pull to fully
extend tether strap into a "V" shape.
Locate the hook on the strap and loosely
attach the tether to an anchor point.
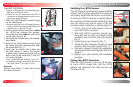
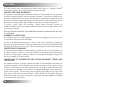
See figure A for forward-facing installation.
See figures B and C for rear-facing
installation.
Rear-facing installation may also require the use
of the Tether Connector Strap, as described on
page 25.
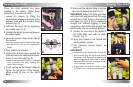
Pull the adjuster strap to remove all slack.
Verify there is tension in the tether strap and
that child restraint is properly secured. The
restraint is stable when it cannot be moved
front to back or side to side more than 1 inch
(2.5 cm.) at the belt path.
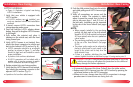
NOTE:
The rear-facing recline angle of the child restraint should be 30
º
-45º from ver-
tical (not to exceed 45
º from vertical)
when car is parked on a level surface.
The rear-facing recline angle can be adjusted by placing a rolled towel or pool
noodle in the crease of the vehicle seat, and the restraint can be stabilized by
tightening the tether as shown in figure C, using anchor point 3.
It may be necessary to loosen the tether and vehicle seat belt before adjusting
the recline position.
1�
2�
3�
4�
5�
•
•
6�
7�
•
•
•
A
B
C
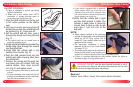
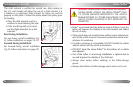
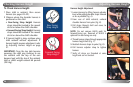
Because every vehicle model is different, sometimes you
cannot find a location to properly anchor the tether or the
structural part of the seat is too large for the hook. Use the tether connector strap to
assist in creating an anchor point (fig. D).
Find a fixed vehicle-seat-belt anchor or vehicle seat leg (that is bolted to the floor)
to which the strap can be wrapped around.
If you cannot find an acceptable location to create an anchor point, contact the
vehicle manufacturer to identify a suitable tether connection point.
Loop the strap around the metal anchor.
Take the metal D-ring and thread it through the webbing loop on the other end
of the strap.
Pull the metal D-ring all the way through until the strap is tight around the metal
anchor.
Use the D-ring as an attachment point for hook on tether strap.
1�
2�
3�
4�
5�
6�
D
WARNING: Only use the tether connector
strap for rear-facing tether installation.
Rear-Facing Tether Connector Strap
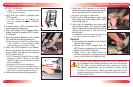
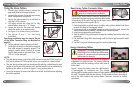
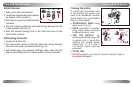
WARNING: The energy-absorbing tether has
been designed to indicate when child restraint
has been in a severe crash and replacement of
child restraint is necessary.
E
F
Energy-Absorbing Tether
Figure E shows the tether when the child restraint is
acceptable for continued use. The colored stitching
will be intact and the webbing will be held under a
tether label.
Figure F shows the tether when the child restraint
is unacceptable for continued use. The colored
stitching will be broken and the loops will have pulled through the back side of
the shell. The tether label may also be torn. If this condition occurs, discontinue
use of the child restraint and contact Britax Consumer Services for further
instruction.