


22
23
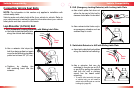
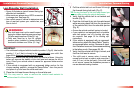
Attach one LATCH connector to its adjacent 6
vehicle LATCH anchor (Fig. D) in the upright
position (Fig. E).
An audible click confirms attachment.•
Ensure that the LATCH strap is not twisted.•
TIP:
You may need to turn the back of the child
seat toward you for easier access to the vehicle
LATCH anchor.
Attach the remaining LATCH connector to its 7
adjacent vehicle LATCH anchor (Fig. F) in an
upright position (Fig, E).
An audible click confirms attachment.•
Ensure that the LATCH strap is not twisted.•
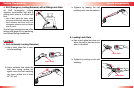
NOTE: If an audible click is not heard when
connecting either LATCH connector, the LATCH strap
may be twisted, or there may be debris in the LATCH
connector. Correct either situation before continuing
with the installation process.
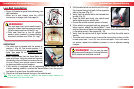
Push the child seat into the vehicle seat while 8
pulling the LATCH strap tight (Fig. G).
IMPORTANT: Ensure the LATCH strap does not fold
into the LATCH adjuster while tightening.
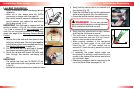
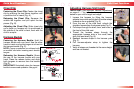
Attach the Versa Tether9
®
hook to the vehicle’s
designated tether anchor for the chosen
seating position. Remove all slack from the
tether to secure. Store excess webbing in the
tether pouch. See pages 29 – 32.
Verify that all connections are secure and that the child seat is stable. 10
The child seat is secure when it cannot be moved front- to-back or side-to-•
side more than 1 in. (2.5 cm) at the belt path. If the child seat is not secure,
repeat the installation process or use an alternate seating location.
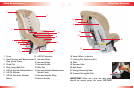
IMPORTANT: This child seat is shipped with the buckle
in position 1 (Fig. B). Use buckle position 1, 2 or 3 that is
closest to but not underneath your child. See page 38 for
Adjusting Harness Buckle Position.
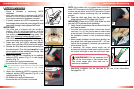
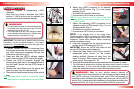
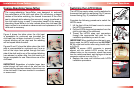
If stored, remove the LATCH connectors from 1
the storage slots under the cover (page 34) and
pull both connectors competely through the
child seat’s right side (Fig. C).
Press and hold the LATCH adjuster release 2
button, then pull the LATCH strap to full length.
Thread one LATCH connector through the 3
forward-facing belt path to the opposite side of
the child seat. Ensure that the LATCH strap is
not twisted.
Remove the Versa-Tether from the pouch and 4
place it up and over the child seat back.
Place the child seat forward-facing on the vehicle 5
seat.
TIP: You may need to raise or remove the vehicle
head restraint to achieve best fit of the child seat.
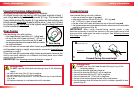
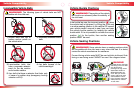
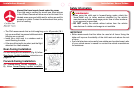
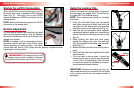
LATCH Installation
Figure A illustrates a forward-facing LATCH •
installation.
Verify that your vehicle is equipped with LATCH •
anchors. If LATCH anchors are not available, you
must use vehicle belt installation methods.
WARNING! Refer to your vehicle owner’s manual or
contact the vehicle manufacturer for the maximum weight rating for
their LATCH anchors. Use vehicle belt (not LATCH connectors) for
installations with children who weigh more than the vehicle LATCH
anchor limit. Unless specified otherwise by the vehicle manufacturer,
assume a 40 lbs (18.1 kg) child is the vehicle LATCH anchor limit.
Installation: Forward-Facing Installation: Forward-Facing
F
G
C
A
E
To p
Release
Button
WARNING!
This child seat must not be used forward-facing •
for children less than one year of age OR who
weigh less than 20 lbs (9.1 kg).
This child seat must be in full upright position •
when installed forward-facing for children who
weigh more than 33 pounds (15.1 kg).
B
D