12 Other changes
In addition to entering hexadecimal values, you can also spec-
ify MIDI events for scene recall by entering the desired MIDI
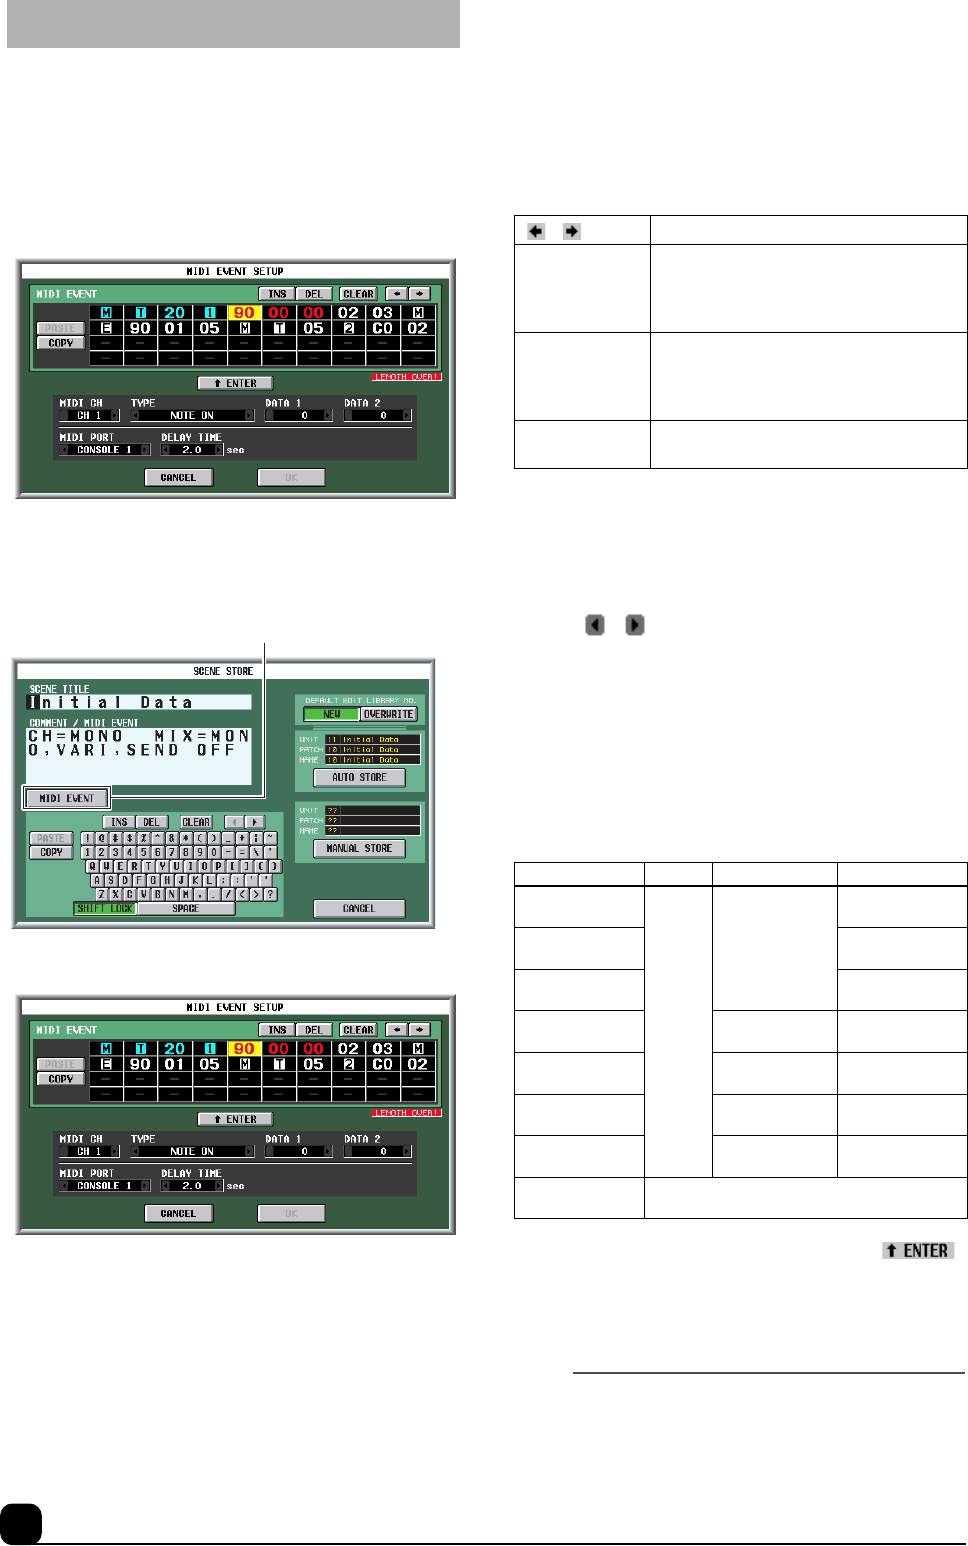
events using the list in the new MIDI EVENT SETUP pop-up
window. To open this pop-up window, a MIDI EVENT button
has been added to the SCENE STORE pop-up window and the
SCENE TITLE pop-up window.
You can also delay the output of MIDI events by a specified
time.
1. Click the STORE button on the MEMORY screen for the Scene
function to display the SCENE STORE pop-up window. Alterna-
tively, click the TITLE EDIT button to display the SCENE TITLE
EDIT pop-up window.
2. Click the MIDI EVENT button to open the MIDI EVENT SETUP
pop-up window.
In this pop-up window, you can assign MIDI events using one
of the following two methods:
1 Directly inputting hexadecimal values
With this method, you directly input the message as hexadeci-
mal values.
In this window, you can input a message by clicking the desired
input box to select it (the box will be highlighted) and rotating
the [DATA] encoder. Use the [INC]/[DEC] switches to move
the input position.
When you click a box in which a hexadecimal value has been
input, the range of values that can be interpreted as a valid
MIDI message (including that box) will turn red. The lower
part of the window displays the MIDI channel (MIDI CH),
message type (TYPE), and data values (DATA 1, DATA 2) that
are interpreted from this MIDI message, enabling you to verify
that the appropriate MIDI message has been input.
You can use the following buttons to input or edit the message
in this window.
2 Specifying the type of message
With this method, you specify the desired MIDI channel, type
of message, and data value. This information will be converted
into the appropriate hexadecimal values.
Click the first box into which you want to input data. Next,
click the [ ]/[ ] buttons at the left and right of the TYPE
box or use the [DATA] encoder to select the type of message.
Then use the MIDI CH, DATA 1, DATA 2, MIDI PORT boxes
to specify the MIDI channel, MIDI event settings, and output
port. The values that can be selected in the MIDI CH, DATA 1,
and DATA 2 boxes will depend on the type of message you
selected first.
The DELAY TIME box enables you to set the amount of time
by which the MIDI event output is delayed after scene recall.
You can set this delay time in 0.1 sec steps.
When you have specified all of the values, click the “ ”
button in the screen. The hexadecimal values for that message
will be input in the input box of the MIDI EVENT SETUP
window. As necessary, you can edit the message by clicking an
input box and rotating the [DATA] encoder.
Note
• The maximum length of MIDI events you can enter is 32 bytes,
including the MIDI output destination port and other data and
comments. When the number of bytes exceeds the maximum,
the “LENGTH OVER!” message will appear.
Inserting MIDI events from the event list
MIDI EVENT button
[ ]/[ ]buttons
Move the highlighted area to left or right.
INS button
Inserts a space (blank) at the highlighted
position. Pressing the <Insert> key on a
PS/2 keyboard will produce the same
result.
DEL button
Deletes the character at the highlighted
position. Pressing the <Delete> key on a
PS/2 keyboard will produce the same
result.
CLEAR button
Erases the entire message that was input
in the MIDI message input boxes.
TYPE MIDI CH DATA 1 DATA 2
NOTE OFF
1–16
Note number
(0
–
127)
Note-off velocity
(0–-127)
NOTE ON
Note-on velocity
(0–127)
KEY PRESSURE
Pressure value
(0–127)
CONTROL
CHANGE
Control number
(0–127)
Controller value
(0–127)
PROGRAM
CHANGE
Program number
(0–127)
—
CHANNEL
PRESSURE
Pressure value
(0–127)
—
PITCH BEND
Pitch bend MSB
(0–127)
Pitch bend LSB
(0–127)
EXCLUSIVE
MASSAGE
—
