


3
Topcom Babytalker 2000
ENGLISH
3 Description
See folded cover page
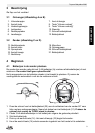
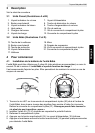
3.1 Parent Unit (Illustration A and B)
3.2 Baby unit (Illustrations C and D)
4 Getting started
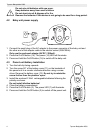
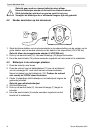
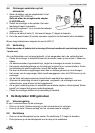
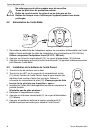
4.1 Baby unit battery Installation
The baby unit can be used either with 3 AA - Size batteries (alkaline batteries recommended)
or the household AC current. The Baby unit has no charging function!
It is recommended to add the batteries. It will automatic backup when there is a main power
interruption.
1. Turn the screw 90° of the battery cover (20) on the backside of the baby unit in a counter
clockwise direction using a screw driver. Remove the battery cover (21). Do not try to
rotate the screw further than the position ‘open’.
2. Install 3 AA alkaline batteries following the polarity as shown.
3. Close the battery compartiment.
4. Press the On/Off button (14). The power (16) LED will illuminate.
5. Press and hold the On/Off button (14) to switch off the baby unit.
1. Volume indicator LED’s
2. On/Off button
3. Link indicator LED
4. Speaker
5. Desktop charger
6. Charging LED
7. Power LED
8. Volume down button
9. Volume up button
10. Belt Clip
11. Battery cover screw
12. Battery cover
13. Night Light button
14. On/Off button
15. Paging button
16. Power LED
17. Night Light
18. Microphone
19. Hang handle
20. Battery cover screw
21. Battery cover
+
+
+
+
-
AAx
1
+
-
A
A
x
1
+
-
AA
x1
90° MAX