


A
B
C
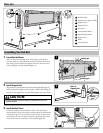
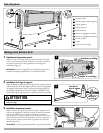
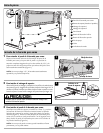
Parts List
2
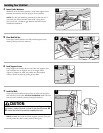
Assembling Your Bed Rail
1
Locking pin
Locking pin
Bed Rail Panel
Support Arms (right and left)
Support Rod 1
Support Rod 2
Side Panel
Lower Release Button
Upper Release Button
Support Foot
Elbow
Lock Indicators
A
B
C
Holes in
Support Foot
D
D
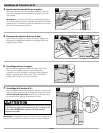
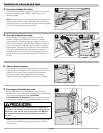
3
3a
Locking
pins
• Check to ensure that pins are locked, by pulling up on rod in the
opposite direction.
CAUTION:
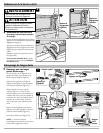
1
Extend Bed Rail Panel:
With one hand on each edge of the bed rail panel, pull apart to
open the panel to its fully extended position. Be certain to listen for
two clicking sounds and feel through the cloth and be certain that
both locking pins are fully extended (Figure 1).
PAGE 2
2 Install Support Rod:
Align arrows on rods and place into hole on both support feet (Figure 2).
Be sure that both locking pins click into place. Confirm that locking pin
pops up in each support arm. Connect both support rods until it clicks.
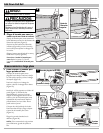
3 Install Bed Rail Panel:
Locate the support arms assembled in Step 2 and press lower
release buttons, lifting side panels to expose elbows and fold down
side panels (Figure 3). Line up the rails on the bed rail panel with
the channels on each side panel. With the logo facing down slide
the bed rail panel into channels on side panels (Figure 3a).
E
F
G
H
I
J
E
F
G
H
I
J
J
Click
Click
Click