


PA B-21X
STEP 2
BE CAREFUL TO ASSEMBLE ALL COMPONENTS
IN THE SEQUENCE THAT THEY ARE PRESENTED.
NOTE:
finger tighten all hardware in this step. DO NOT wrench tighten
until the last step. some components may be pre-assembled.
nylon lock nuts will not fully screw onto bolts, must wrench tighten.
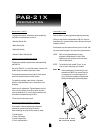
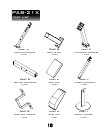
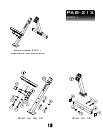
2A. slide upper mainframe (F) onto lower mainframe (A).
2B. attach mainframe support (C) to lower mainframe (A)
and upper mainframe (F) using:
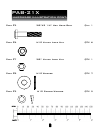
2 - (#2) M10X70mm hex head bolt
2 - (#6) M10 nylon lock nut
2C. attach back pad (H) to lower mainframe (A) using:
1 - (#3) M10X70mm thumb screw
1 - (#9) M10 spring washer
1 - (#8) M10 washer
2D. Attach back pad holder (G) to back pad (H) using:
2 - (#4) M10X20mm hex head bolt
2 - (#9) M10 spring washer
2 - (#8) M10 washer
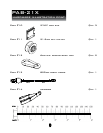
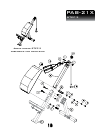
2E. Attach ø51.5mm pulley (11) to upper mainframe (F)
using:
1 - (#5) 3/8”X2 1/4” hex head bolt
1 - (#7) 3/8” nylon lock nut
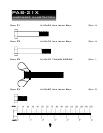
2F. Route 820mm cable (#13) over pulley (#11) and under
bar of upper main frame (F). Attach ball end of
cable to snap link (#12) then harness (#14). Attach
other end of cable to snap link (#12) then weight
holder (I) which might be inside a white foam box.
14