14
OPERATIONS
Loop Playback
7 Creating a loop
1. Press the PLAY/PAUSE button (6) button to start play-
back.
2. During playback, press the IN/REALTIME CUE/HOT LOOP
button at the loop-in point.
¶ Note that this operation is not needed if a prerecorded cue
point is to be used as the start of the loop.
3. During playback, press the OUT/OUT ADJUST button at
the desired loop-out point.
¶ Loop playback will start between the loop-in point and loop-out
point.
¶ By using the frame search, the loop-out point can be set in
units of frames.
¶ During playback of MP3s, looping is only possible within one
and the same track set having a cue point.
7 To start loop playback with automatically set
loop-out point (Auto BEAT LOOP)
Press the BEAT LOOP/LOOP CUTTER during playback or
pause mode.
¶ The point at which the button is pressed will be set as the loop-
in point, and a loop-out point will automatically be set based on
the track’s BPM; loop playback will then start.
¶ If the numerical BPM value is not displayed, loop play will be-
gin based on BPM=130.
7 To cut the loop length in half (LOOP CUTTER)
Press BEAT LOOP/LOOP CUTTER button during loop play-
back.
¶ The loop length will be cut down to one-half each time the but-
ton is pressed (Smallest loop length is one frame).
7 Returning to loop-in point during loop playback
to start over the loop playback (HOT LOOP)
Press IN/REALTIME CUE/HOT LOOP button during loop play-
back.
¶ Returns to loop-in point and restarts loop playback.
7 To exit loop playback
Press RELOOP/EXIT button during loop playback.
¶ The track will continue playback in sequence from the loop out
point without returning to the loop-in point.
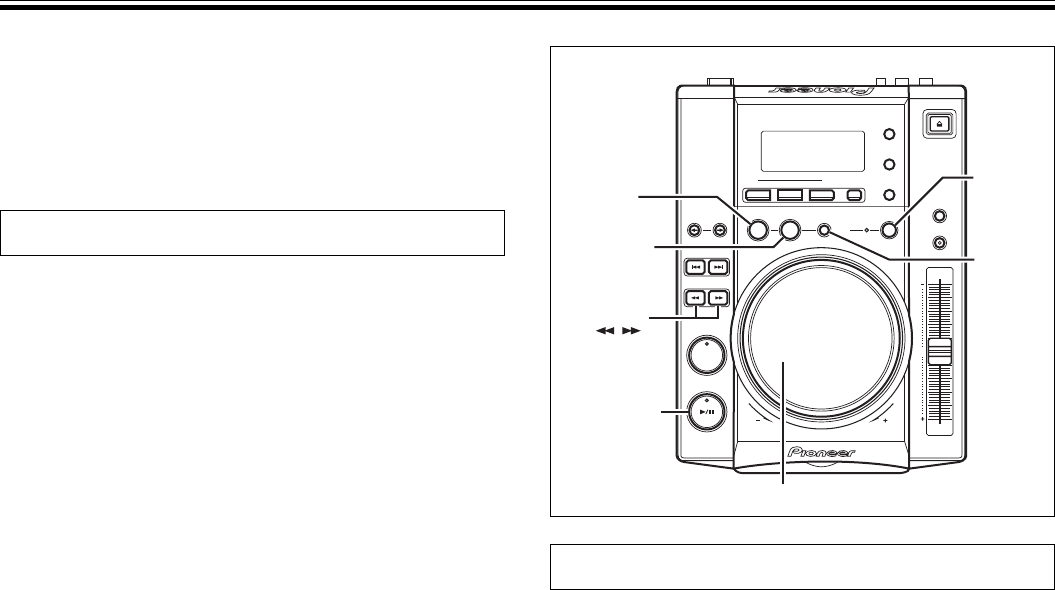
PLAY/PAUSE
SEARCH
RELOOP
/EXIT
LOOP OUT
/OUT ADJUST
LOOP IN/
REALTIME CUE
/HOT LOOP
BEAT
LOOP/
LOOP
CUTTER
Jog dial
7 Cue point sampler (confirming cue points)
After specifying a cueing point, press the CUE button in the
cue standby mode.
¶ The sound at the specified cue point will continue to play as
long as the CUE button is pressed.
¶ During playback of MP3s, sounds can be heard only for cue
points within the same folder.
Mixing Different Tracks
Example: Mix track B with track A which is currently playing from
the speakers.
¶ Connect CD1 to the DJ mixer’s CH-1, and connect CD2 to CH-2.
¶ Raise the TRIM, CHANNEL FADER, and MASTER VOLUME set-
tings appropriately so that sound is produced from CD1.
1. Set the DJ mixer’s CROSS FADER slider at its left side (CH-
1).
¶ Track A is heard from speakers.
2. Load a CD on player CD2.
3. Press the TRACK SEARCH buttons (4, ¢) on player
CD2 to find and select track B.
4. Operate the DJ mixer’s MONITOR SELECTOR button to
monitor CH-2.
5. Turn the DJ mixer’s MONITOR LEVEL dial so that track B
can be heard from the headphones.
¶ Only track A is heard from the main speakers.
6. Set cueing position for track B on the headphones.
1 With player CD2 in the playback mode, press the PLAY/PAUSE
button (6) near the desired cueing point.
¶ The player will enter the audible pause mode.
2 Rotate player CD2’s jog dial and search for the track’s cueing
point (first beat).
3 When cueing point is found, press player CD2’s CUE button.
¶ The player’s sound will be muted and cueing will be com-
pleted.
7. Simultaneously press player CD2’s PLAY/PAUSE button
(6) along with the sound of track A played from the
speakers.
¶ Only track A will be heard from the main speakers.
¶ Track B will be heard from the headphones.
8. Move the TEMPO control slider so that the tempo
(BPM=Beat Per Minutes) of track B and A matches.
Move the TEMPO control slider of player CD2’s so that the BPM of
track B matches the BPM of track A.
¶ When the two BPM rates match, the BPM synchronization is
complete.
9. Press the CUE button on player CD2.
¶ Player CD2 will enter pause mode at the cue point.
10.
Press the PLAY/PAUSE button (6) of player CD2 in time
with track A of player CD1 (the sound heard from speaker).
¶ Track B will begin playing.
11. While checking the sound on the headphones, gradually
move the DJ mixer’s CROSS FADER slider from left to
right.
¶ The sound of track A from the speakers will gradually be
mixed with the sound of track B.
¶ When the DJ mixer’s CROSS FADER slider is completely
moved to the right side, the sound heard from the speaker
will have changed from track A to track B, and the operation is
complete.
7 Long Mix Play
If the BPM rates match, the mixed sound of track A and track B will
not sound unnatural even if the CROSS FADER slider is placed in the
middle position.
7 Fader Start Play
By using the Cross Fader Start function of the DJM-600, DJM-500,
DJM-300, DJM-3000, DJM-909 or DJM-707, step 10 above can be
skipped for simpler mixing.
In addition, when the CROSS FADER slider is returned to its original
position, the status returns to that in step 9, so that the same play can
be repeated.


