


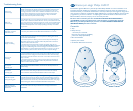

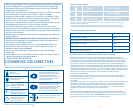


6 7
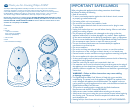
TYPE B APPLIED PART
FOLLOW OPERATING
INSTRUCTIONS
ONLY USE INDOORS
CLASS II EQUIPMENT
GENERAL WARNING
EUROPEAN STANDARD
DISPOSE OF THROUGH
SEPARATE COLLECTION
ROUTE FOR WASTE
ELECTRICAL EQUIPMENT
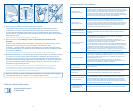
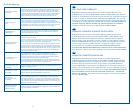
8. Open the lid carefully to avoid any residual steam.
Be careful when opening the lid as steam can escape and cause injury. Use a cloth when
removing the container, as it may be hot (vii). Use the lifter to raise small bottles, VIA Cups
or small food jars. Pull the lifter just above the circular rim. Rest the lifter on the rim where
it naturally sits.
Note: Do not remove the lifter from the warmer.
9. Before feeding your baby: Always check feed temperature before feeding
(a) Milk – shake the bottle, nurser or milk storage container and check the temperature of
the milk by sprinkling a few drops on the back of your hand.
(b) Food – stir the food thoroughly and test it yourself with a spoon to ensure it is not too
hot. If food is not warm enough, consult the Troubleshooting Guide.
Note: Please ensure the lid of the container is tightly secured prior to shaking.
10. Unplug the warmer and empty any residual water (viii). Ensure that the plug does not come
into contact with water. If warming an additional bottle or container, continue from step 1.
Otherwise, clean the inside and outside of the warmer with a damp cloth (viii). To remove
the lifter for cleaning purposes ONLY, lift vertically up until it naturally resists. Push the
handle away from you and rotate 90º or until it can naturally be removed, then lift out
Note: For microbiological and hygienic reasons, once heated, milk and food should not
be reheated again, and should be discarded if not used immediately. Please consult your
health professional/breastfeeding advisor for further guidance about safety recommendations
on feeding.
Note: If at any time the warmer is switched on and not running a cycle, it will automatically
turn off after 3 minutes if no selections have been made.
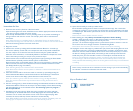
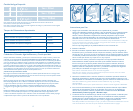
i ii iii iv
Instructions for Use
1. Ensure that the warmer is placed on a rm level surface.
Open the lid using the front catch, and ll the warmer with the appropriate amount of water (i)
– See chart on page 5 to determine water amount.
Place the fully assembled bottle or nurser (including dome cap to prevent overheating) or
storage container with lid in the warmer. For food jars, please refer to manufacturer’s
instructions.
Note: When warming an 11oz/330ml bottle
or an 8oz/236ml Tempo
, the lid ap will lift to
accommodate the larger size. This will cause a small amount of steam to rise from the warmer.
Close the lid ensuring that the front catch ‘clicks’ shut.
2. Plug in the warmer.
3. Switch on the warmer by holding the Power/Mode Selection Button for 3 seconds (ii).
The warmer will beep, and the milk, room temperature and oz/ml symbols will illuminate.
It is now ready for use. If the lid has not been closed correctly, the symbols will ash.
When the unit is switched on, it automatically defaults to the milk/room temperature mode.
If this is the mode you need, go to step 5. If not, proceed to step 4.
4. Choose milk or food, and select the starting temperature (iii) by pressing the Power/Mode
Selection Button repeatedly until the desired symbols are illuminated.
Please note that there are 6 possible options: milk from room temperature, milk from chilled,
milk from frozen, food from room temperature, food from chilled, and food from frozen.
(See Display Guide on page 5 if needed.)
Note: Warming food jars from frozen is NOT recommended.
Note: Please ensure that the correct options are selected, as milk and food should not be
heated for too long.
5. Select the amount of milk or food in the bottle or container by repeatedly pressing the
Volume Selection/Start Button until the desired volume is illuminated (iv). If the desired
amount is not shown on the display, please select the amount nearest to it.
Note: For volumes in grams, select the same amount in ml (e.g. for 80g select 80ml).
Note: The maximum volume that may be selected when warming food from frozen is
8oz/240ml.
6. Start the warming cycle (v): Once the desired settings are illuminated, hold down the Volume
Selection/Start Button until the warmer beeps. The volume display will now ash ascending
and descending lights up to the selected amount. The warming cycle is in progress –
Do not open the lid.
7. Completion of warming cycle (vi): When the cycle is complete, the warmer will beep
intermittently for 30 seconds and all the volume display lights will continuously ash for
3 minutes. You can remove the contents as soon as the warmer begins beeping. After
3 minutes, the warmer will beep 5 times and will turn off automatically.
Note: Philips AVENT recommends removing and using the contents immediately when the
warming cycle is complete, even before the warmer automatically turns off.
v vi vii viii
Key to Product Label