


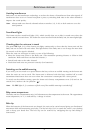

9
V
D
C
9
V
D
C
GB
2
C
H
A
R
G
E
C
H
A
R
G
E
P
O
W
E
R
L
I
N
K
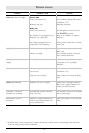
L
E
V
E
L
M
I
C
A
C
H
A
N
N
E
L
B
T
A
L
K
B
A
B
Y
M
O
N
I
T
O
R
I
N
T
E
R
C
O
M
O
F
F
A
C
H
A
N
N
E
L
B
T
A
L
K
P
O
W
E
R
T
R
A
N
S
M
I
T
M
I
C
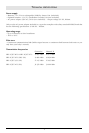
2
1
1
2
3
4
1
2
8
8
7
3
4
5
6
9
10
11
12
7
5
6
9
10
11
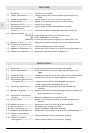
A
C
H
A
N
N
E
L
B
T
A
L
K
12
15
14
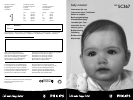
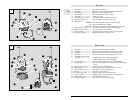
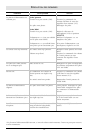
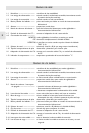
BABY UNIT
1-1 Microphone------------------------- high-sensitivity microphone
1-2 Power light -------------------------- lights when unit is powered; flashes when batteries are low
1-3 Transmit light ----------------------- lights when a sound is being transmitted
1-4 Talk pushbutton-------------------- push this button to talk in intercom mode
1-5 Loudspeaker ------------------------ provides clear sound
1-6 Loudspeaker volume control---- set loudspeaker level for talk-back and intercom
1-7 DC power supply socket -------- plug mains adapter connector into this socket
1-8 Mode switch ------------------------
MONITOR : baby monitoring mode; microphone is sound activated
OFF : switches off the Baby unit completely
INTERCOM : microphone is activated when TALK pushbutton (1-4) is pressed
1-9 Channel selection switch -------- select channel A or B (whichever has least interference)
1-10 Battery compartment cover----- unscrew and unclip to insert batteries
1-11 AC power adapter ---------------- plug into AC mains socket and into DC power supply socket
1-12 Temperature indication----------- approximate baby room temperature in
o
C
PARENT UNIT
2-1 Microphone------------------------- sensitive talk-back and intercom microphone
2-2 Power light -------------------------- lights when unit is powered; flashes when batteries are low
2-3 Link light ---------------------------- lights to show that both units are in touch with each other
2-4 Loudspeaker ------------------------ provides clear sound for monitoring and intercom modes
2-5 Loudspeaker Volume control /
Off switch ------------------------- • set loudspeaker level for monitoring and intercom;
• switches off the power to the unit completely
2-6 Sound-level lights ------------------ the more sound your baby makes, the more lights that light
2-7 Charging base ---------------------- place unit in base to operate it on mains power and when batteries
are low
2-8 Battery compartment cover----- unscrew and unclip to replace batteries
2-9 Talk pushbutton-------------------- push this button to talk in talk-back and intercom modes
2-10 Channel selection switch -------- select channel A or B (same as Baby unit)
2-11 Belt clip ------------------------------ handy clip for carrying the unit
2-12 DC power supply socket -------- plug mains adapter connector into this socket
2-13 AC power adapter ---------------- plug into AC mains socket and into DC power supply socket
2-14 Audible warning switch ---------- sets audible link alarm on or off
2-15 Charging base light ---------------- lights when unit is in the base and charging
13